

Published: Jul 12, 2021 by Isaac Johnson
This past year for the OSN 2021 Speaker Series, I gave a talk on “Full Stack CICD of Kubernetes Microservices using DevOps and IaC”. During that talk, I quickly reviewed WIQ based Automations that could drive IaC. Since then I’ve wanted to take some time to talk through in greater detail how these work so others can use them in their AzDO flows.
Purpose
Often we find in supporting developers as DevOps engineers, we come across common patterns of support. Perhaps that is enabling a new pipeline, or adding a service principal, or onboarding a new repo. In fact, these support issues come up with such frequency it begs the question, could this not be automated?
Method
Since we use Azure DevOps for managing our own work, it seems clear the best approach is to ‘eat our own dogfood’ and create a system that leverages work items queries. We already have users accustomed to entering ‘tickets’ in Azure DevOps. By using “Work Item Templates” we can create inline documentation on our tickets that makes it clear what we expect from the users.
Once we have Work Items created in a consistent fashion with parsable data we can then automate processing of them using a Work Item Query. By making the WIQ cross-project we eliminate the need to have developers be ‘contributors’ on our Project.
High Level Overview
Our desire is to lower DevOps toil by finding common support issues and progressively moving them to automated processes and/or documentation.
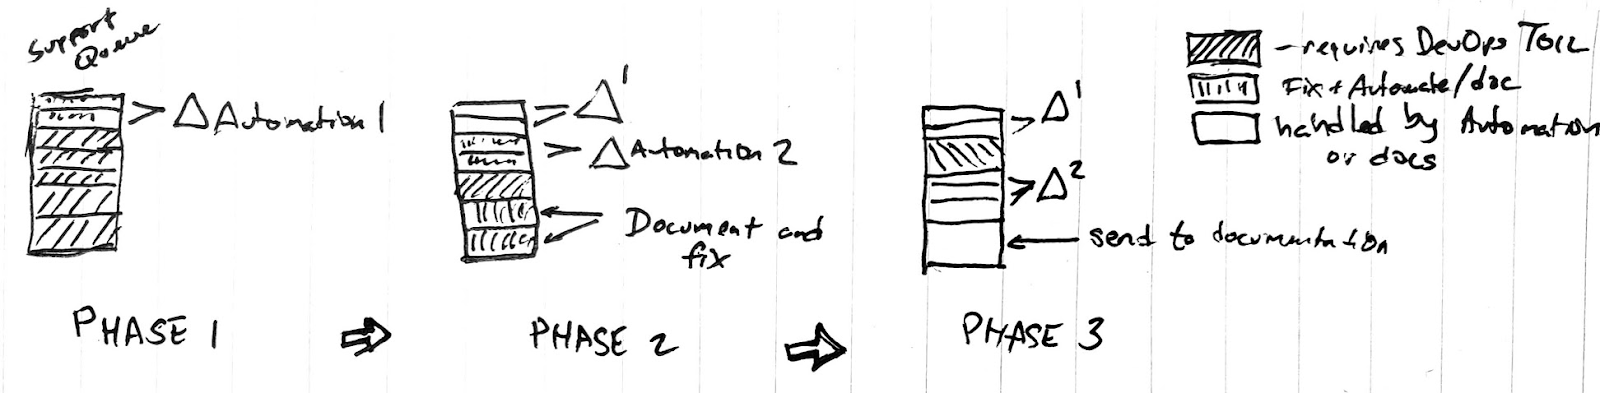
We receive support tasks from our users into a queue. We can think of this as a multiphase approach. We began in Phase 1 by identifying a common support problem (such as creating a Git Repo or Adding a User) and then creating an automation around that (Automation 1). In phase 2 we identify another area to automate (Automation 2) but notice a few issues are really about user confusion that could be solved with better documentation. In this case we update our Wiki and implement Automation 2. By the time we are at Phase 3, we just have 1 ticket in the queue that requires our direct involvement.
By continually improving (Optimizing, see CMMI) we can move more and more support to automations. But we must realize we will never out and out eliminate support; that should really not be the goal. The goal is to continually improve upon our SLO and reduce support frequency.
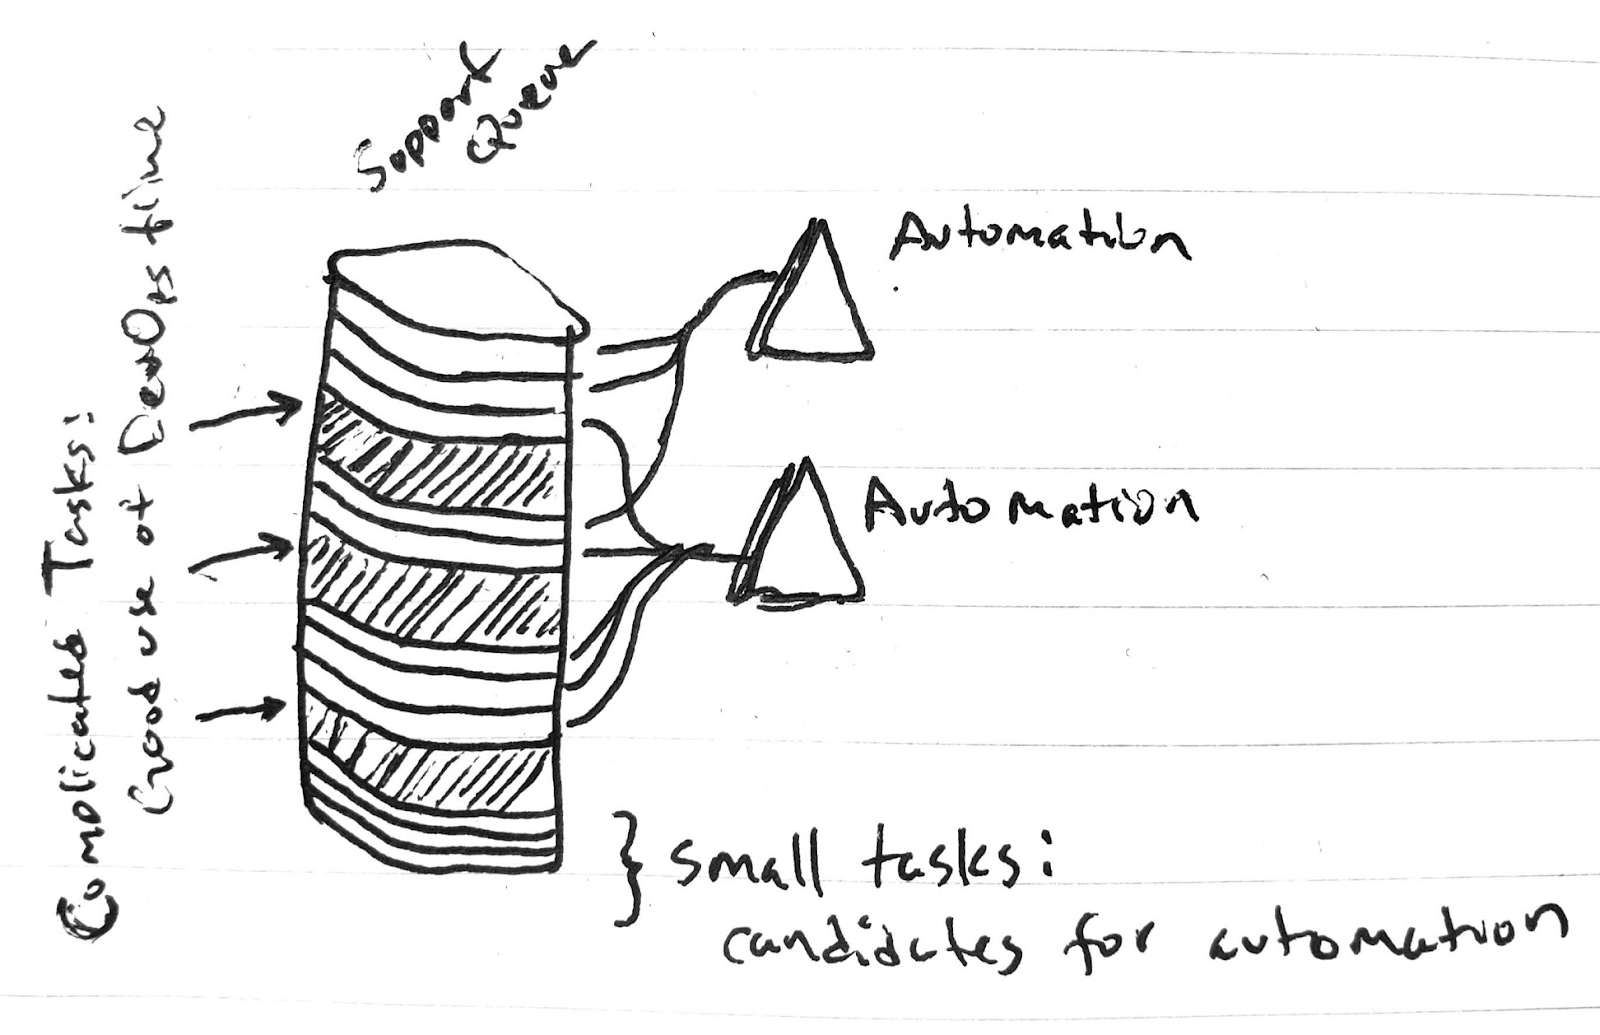
We want to put our effort (toil) just on the most complicated issues (perhaps end cases we had not considered or effects of infrastructure upgrades).
Working Example Walkthrough
First, let’s start fresh and assume a rather unmodified project using the Agile process template. We could use tasks or issues.
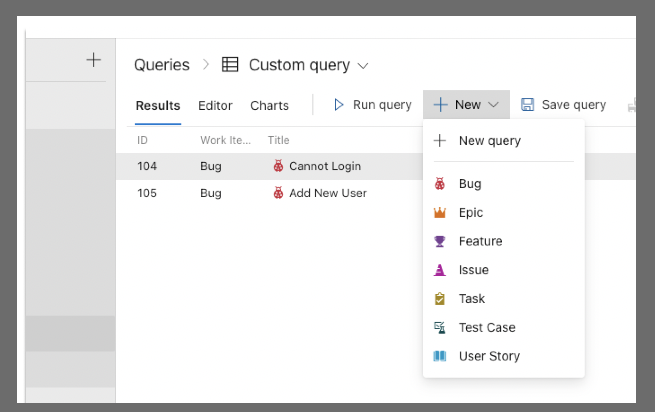
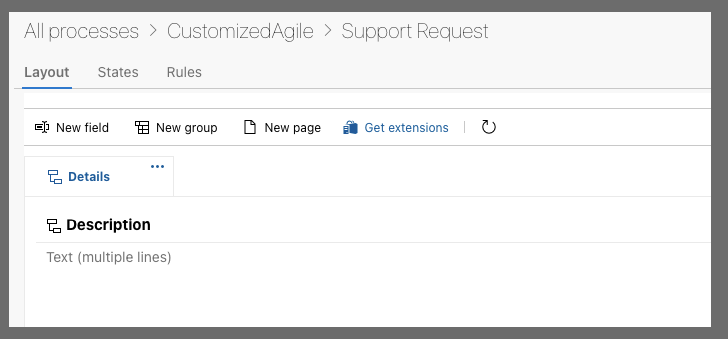
Instead, let’s customize the Agile Template and create a Support Request Work Item type.

Now that we have a basic “Support Ticket”, we could add custom fields for the users to fill out.
However, this would get complicated over time with all the transforms.
The approach I much prefer is using a block of YAML to drive the automations. YAML is a standard, it’s readable, parsable and extensible.
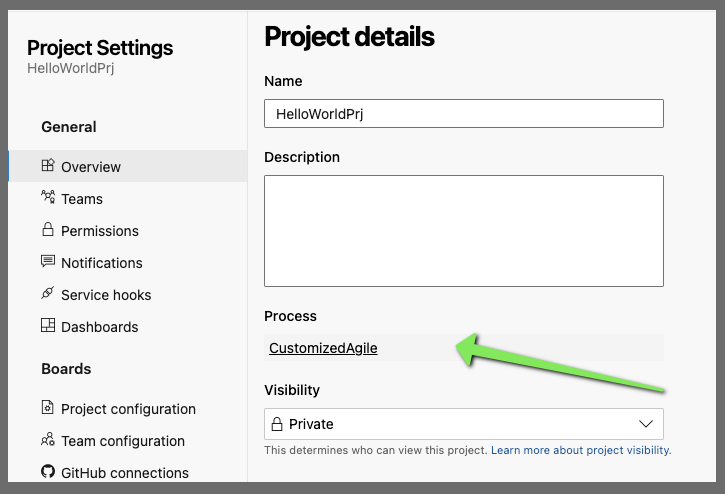
Once we set our project to use the Process Template, we can verify in project details
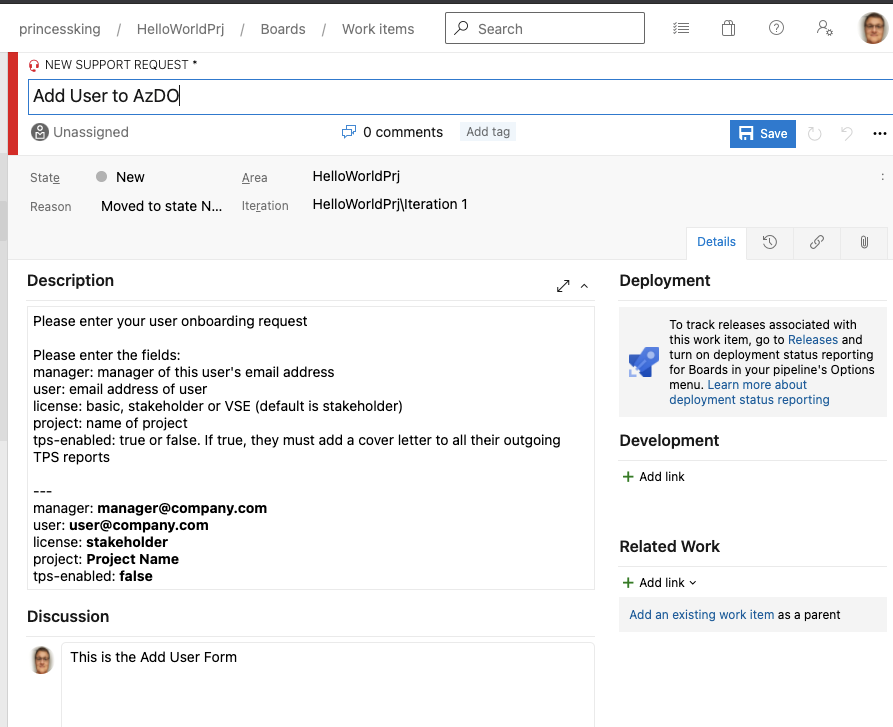
We can then create a support ticket in that project
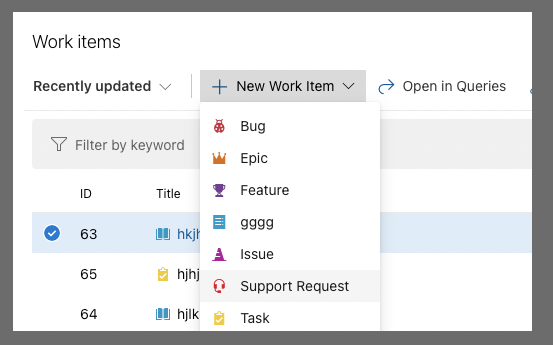
For instance, for an Add User, let’s say the form should look like:
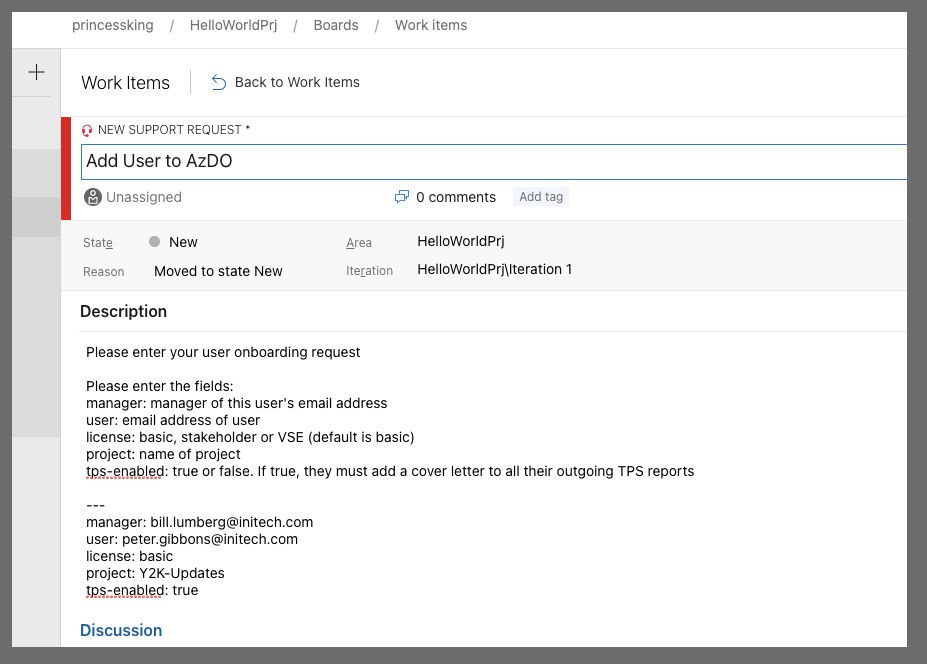
We can tweak the text a bit to require inputs. I’ll then abstract that a bit to:
Please enter your user onboarding request

Please enter the fields:
manager: manager of this user's email address
user: email address of user
license: basic, stakeholder or VSE (default is stakeholder)
project: name of project
tps-enabled: true or false. If true, they must add a cover letter to all their outgoing TPS reports

---
manager: manager@company.com
user: user@company.com
license: stakeholder
project: Project Name
tps-enabled: false
We can then capture that as a template:
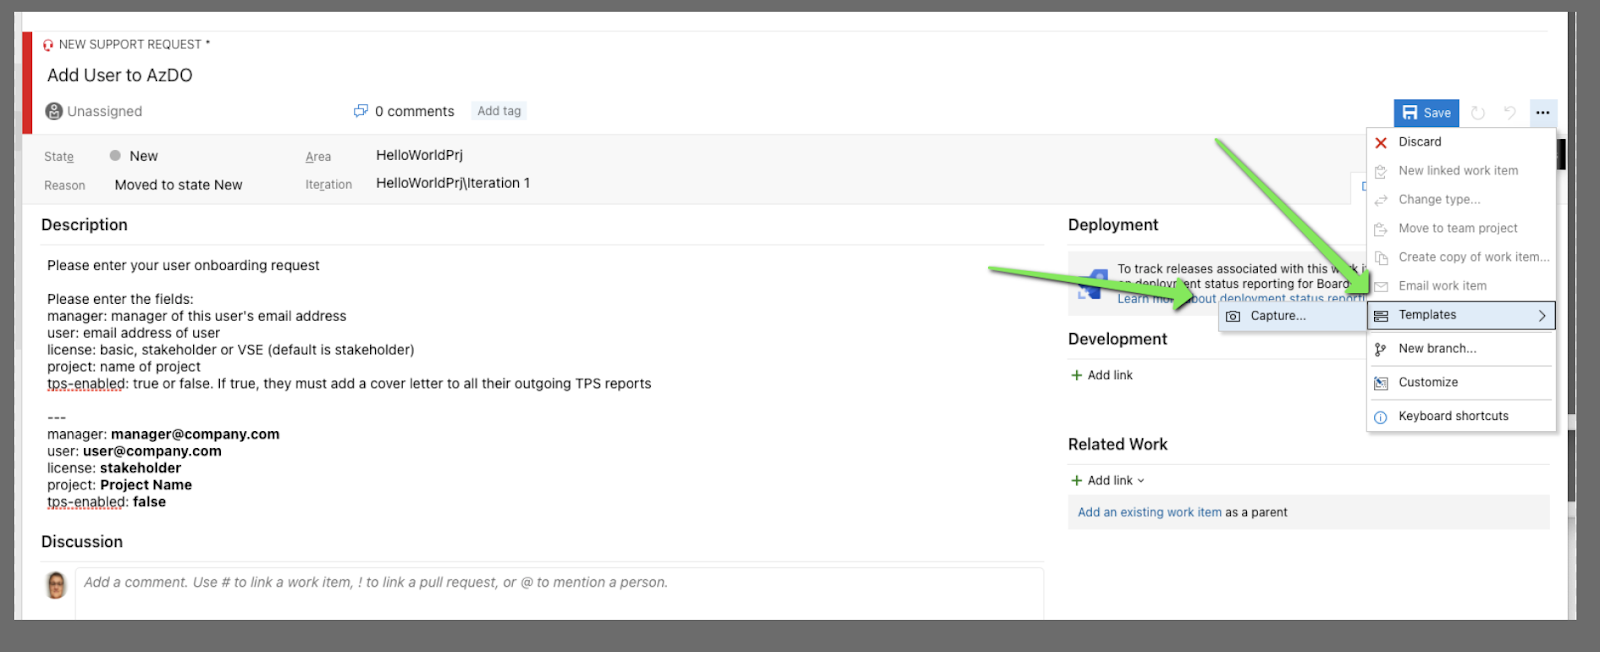
this brings up a form for us
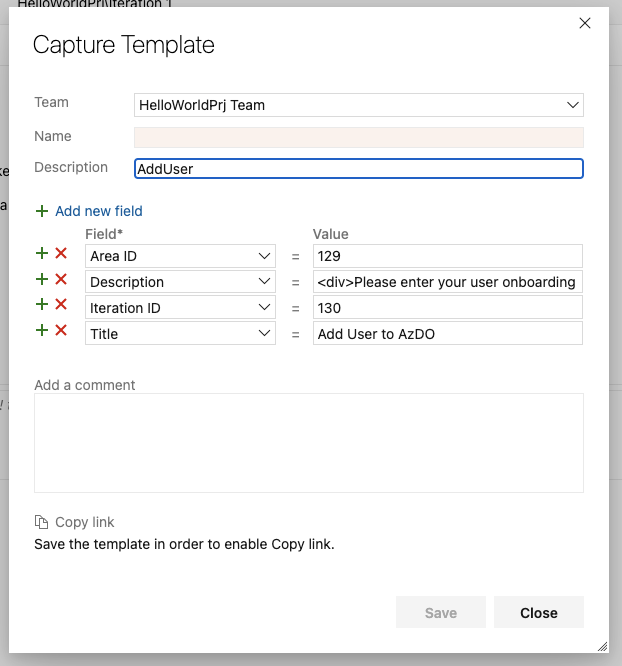
We need to home the _template_ in a team. this should be your DevOps team, whomever owns support.
Then you can click the red x by the fields you do not care to set (and they’ll end up in default). For instance i really don’t want to default the iteration id, but i do want to set the Area by default.
Once we added all our fields we can click save
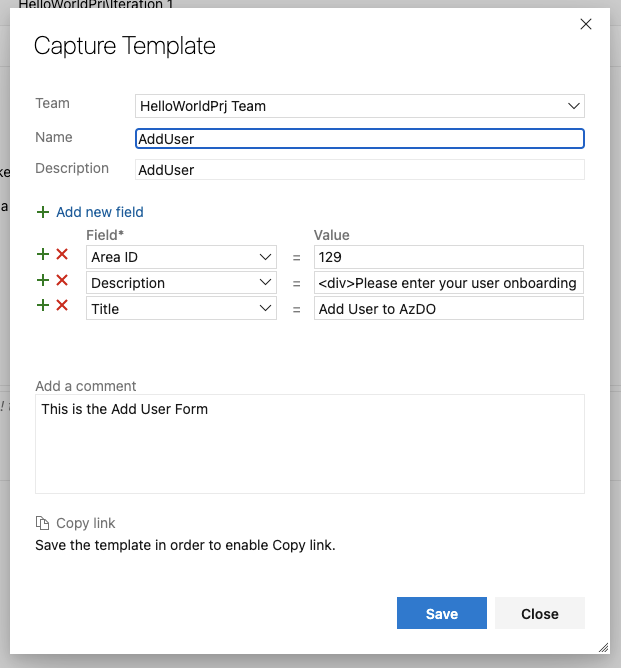
and that lets us copy the link as such
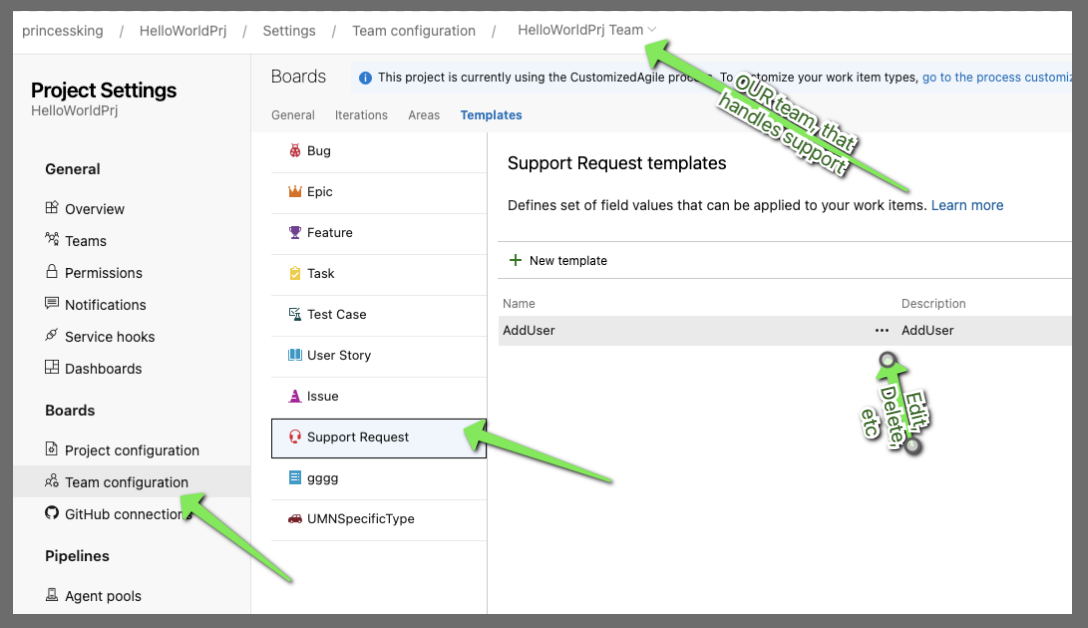
If you need to get back to that link later, or edit this template later, you’ll find it in the Team configuration of the project
Support Documentation
Next i like to make a little wiki so users can find these automations. You may use an external wiki or other system

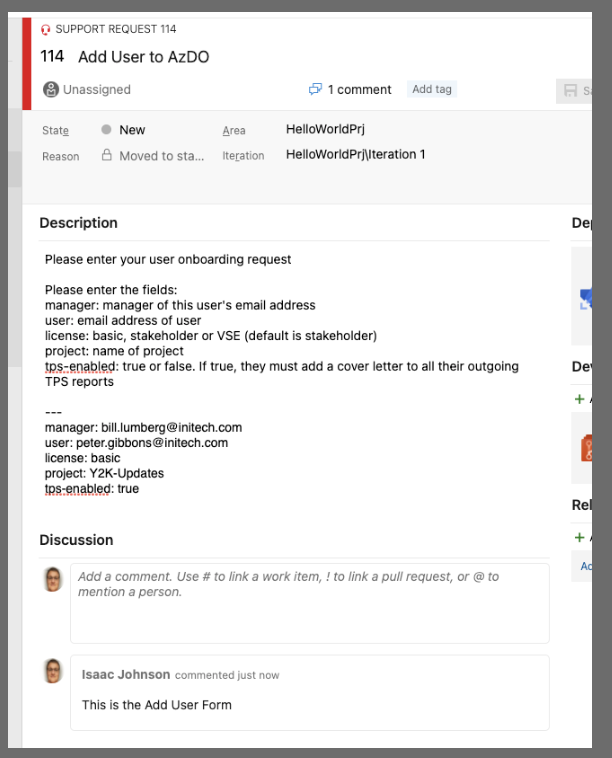
Our users can now see that link on the wiki
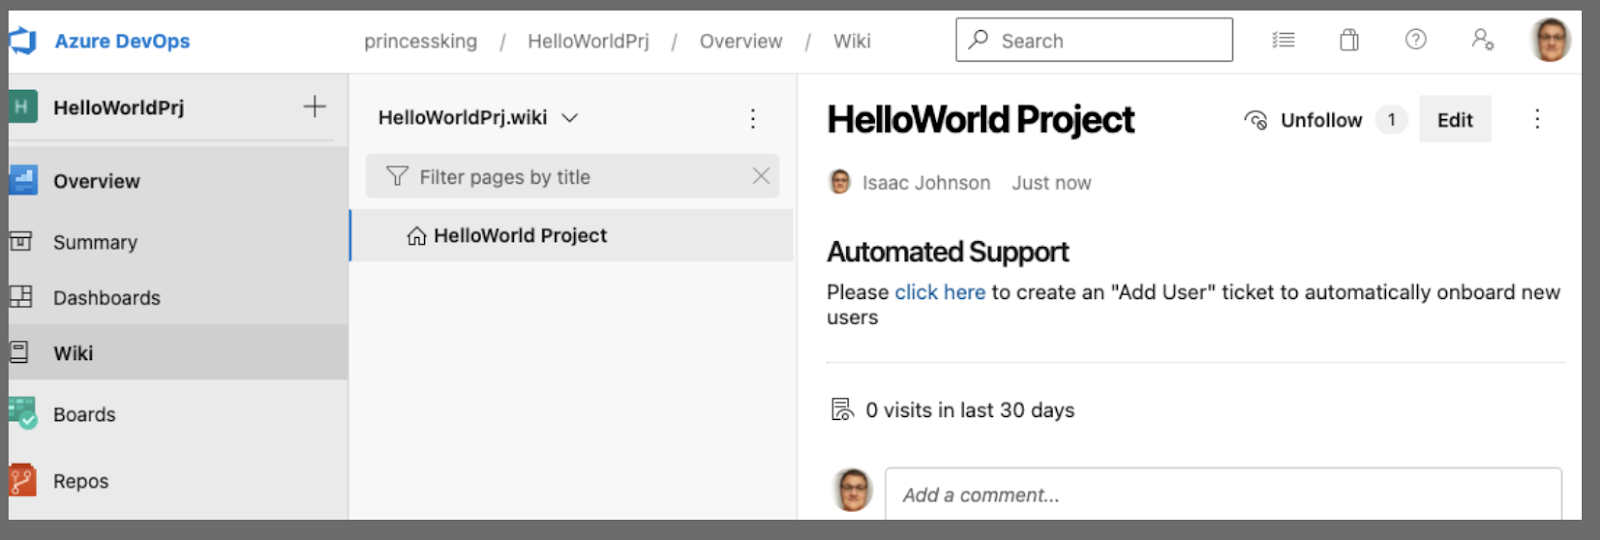
which launches the pre-filled template
Let’s go ahead and update that
Work Item Queries
Next we will want to create a WIQ that can find these tickets for us.
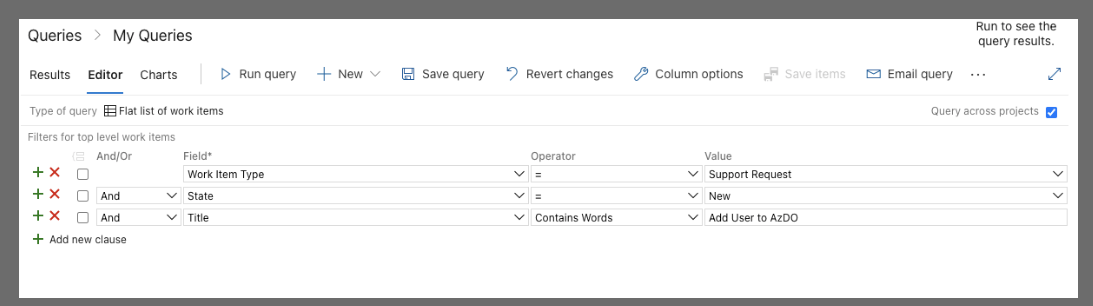
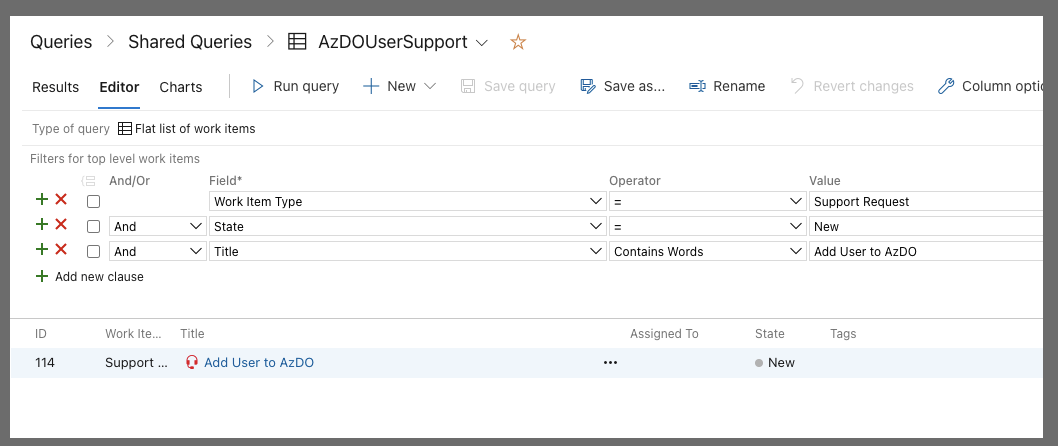
What is key here is we set the type to support request, the state must be New and we have “Title” “contains words” of “Add User to AzDO”. If you have multiple projects to support (as many larger organizations do), then check “Query across projects”.
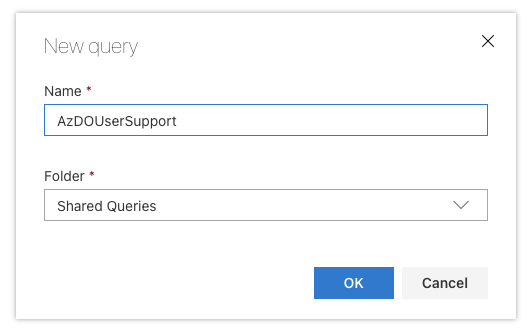
When you save, you likely will want to save that as a shared query (so things like a service account could access them). While i will save as a shared query, in this instance i’ll be using my own user to automate.
Upon save we can see it does find the 1 ticket already
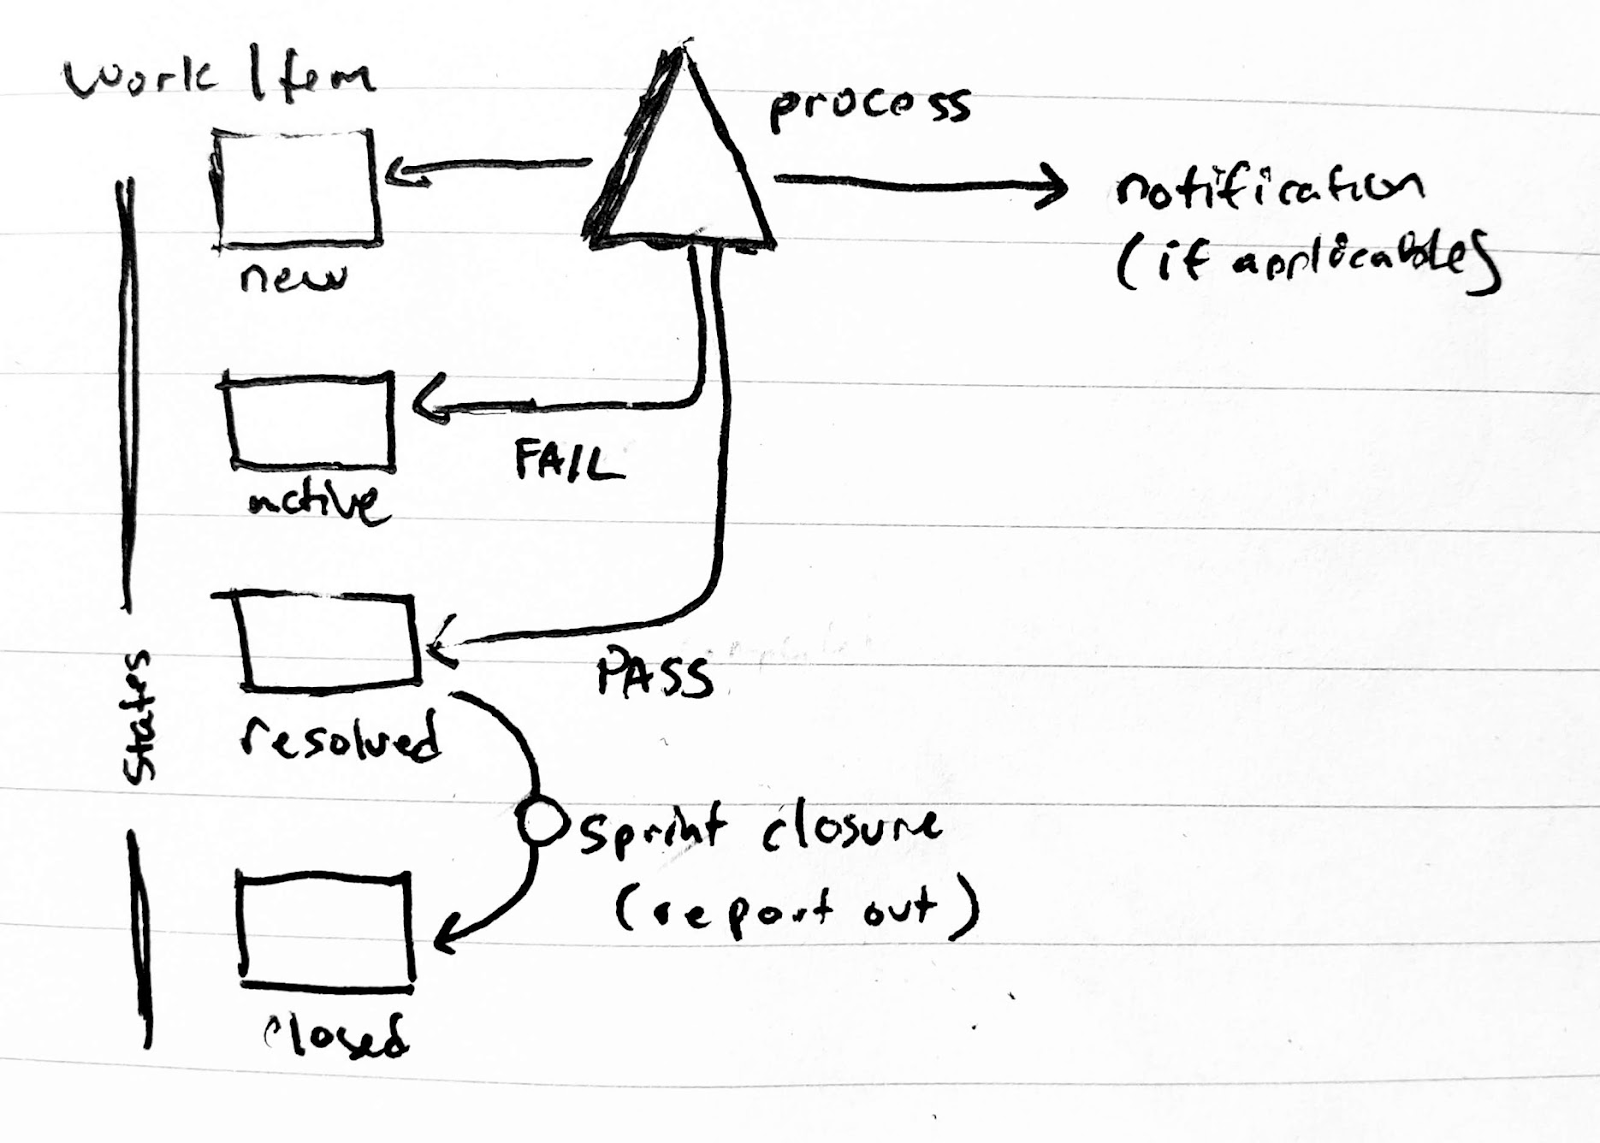
A quick note on why we set “new” only. If there is a problem, we may want to set it to active and a given DevOps user. If we had our query check instead for “not closed” it would continue to try and process an active ticket. It’s far better to only attempt to address one state alone. If there are issues, you can move the ticket _out_ of that state, address them, and send the ticket back _into_ that state to re-queue for processing
Creating a Processing Pipeline
Next we need to home our automations. I usually have a “DevOps” project just for this purpose (as i do not like to co-mingle devops automation repos and developer repos). For this example, we will stick to one project and create it here.
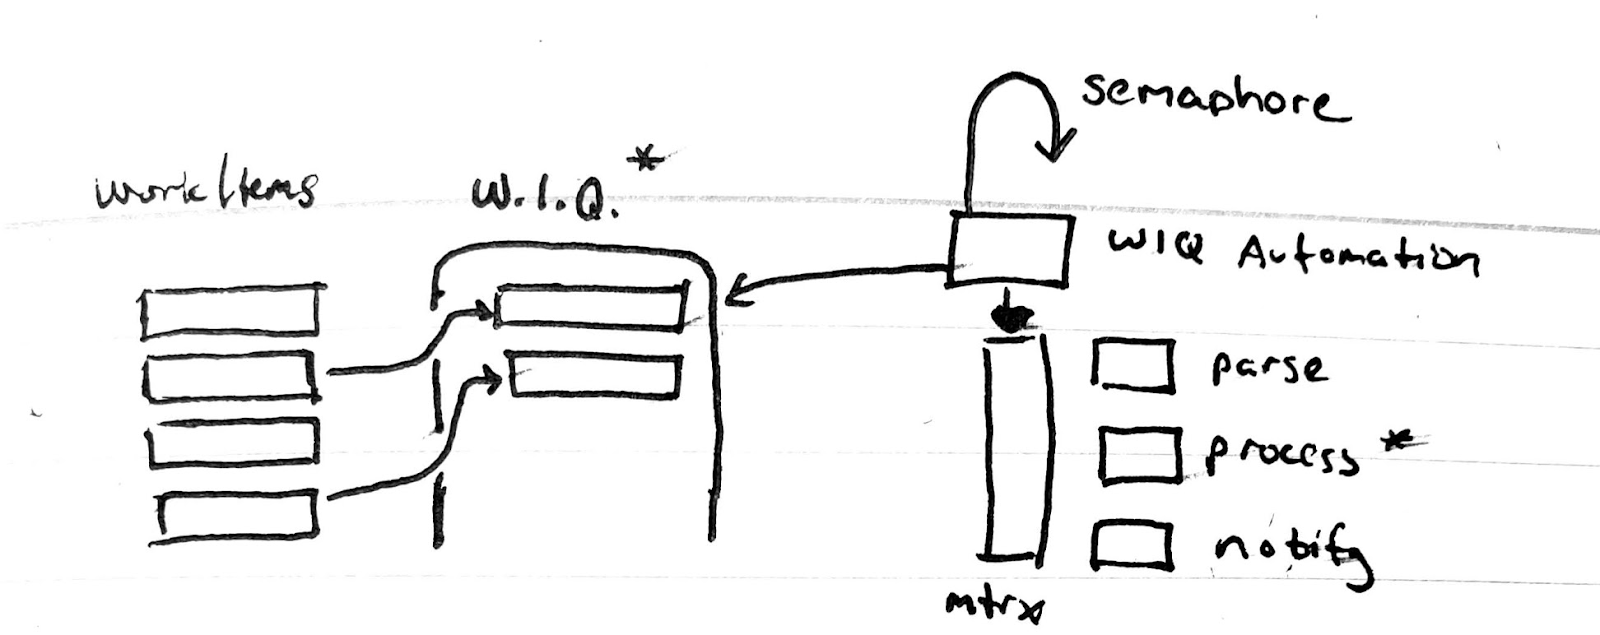
The goal is to make a Work Item Query (WIQ) Automation pipeline on a timer and so we don’t errantly process tickets multiple times on long running jobs, we’ll add a semaphore that checks for existing running jobs.
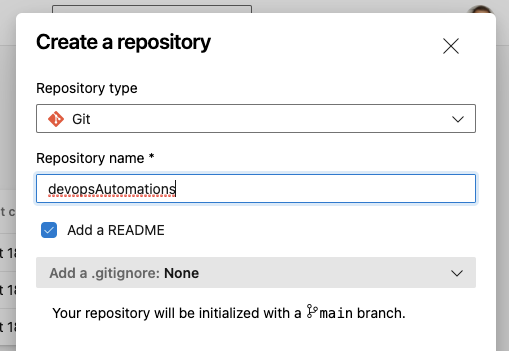
Create a new repository
There are a few differing philosophies on how to manage automation pipelines from here.
One could have many different yaml files in one branch and onboard unique pipelines for each. However, if you had a branch trigger (like trigger: main) then they all queue on update. I tend to make a branch per automation in the same repo.
By keeping in one repo, it makes it easier to merge between (if i have some great new idea).
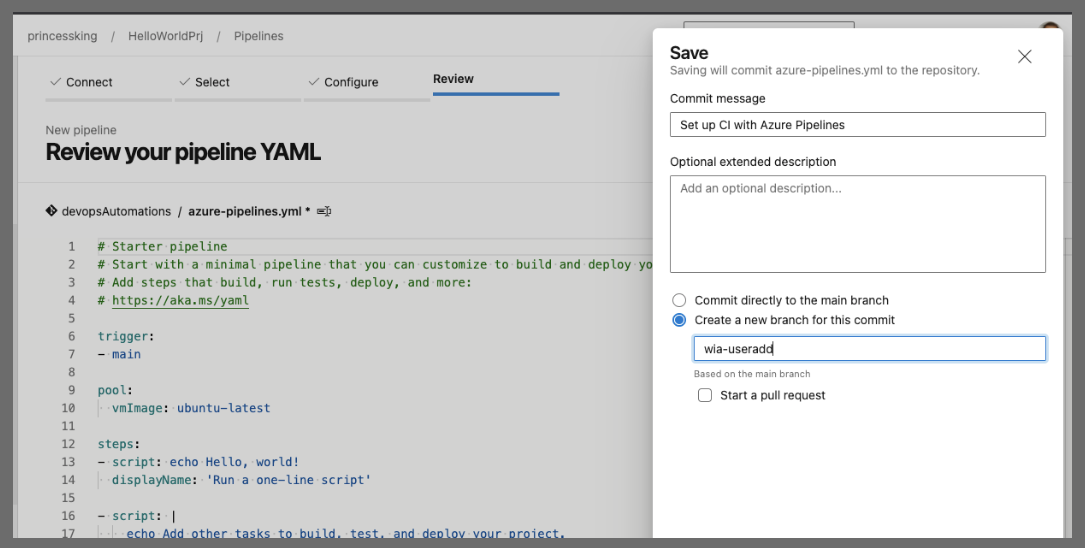
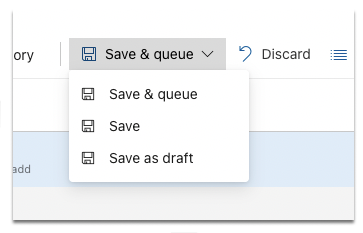
We’ll setup a new build, do a starter pipeline and save it to a branch “wia-useradd”
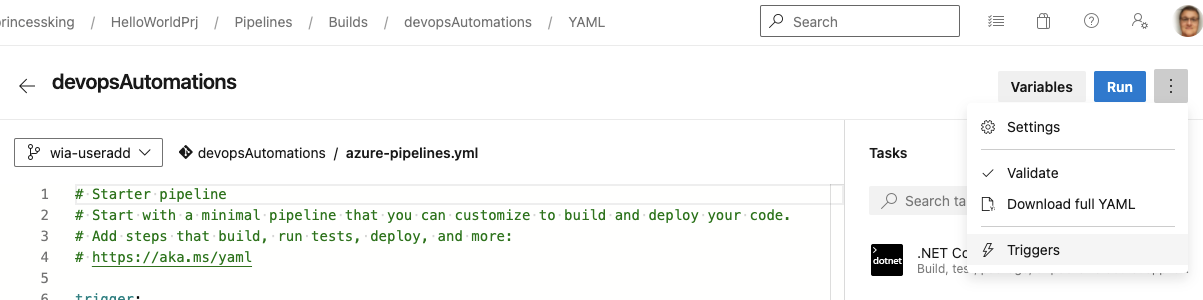
One thing you’ll want to do at some point is to change the default branch in the newly created repo. I only know the sneaky backend way to fix this…
Chose Edit and then pretend to edit triggers
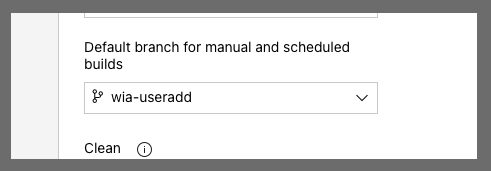
We can then change the default branch to wia-addusers
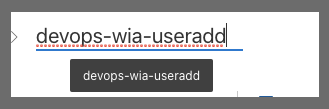
The other thing we can do is rename this (we will have more so naming it right will make them clear later)
Then you can save or save and queue if you like
The rest of the edits I’ll use VS Code to do..
$ git clone https://princessking.visualstudio.com/HelloWorldPrj/_git/devopsAutomations
Cloning into 'devopsAutomations'...
remote: Azure Repos
remote: Found 6 objects to send. (11 ms)
Unpacking objects: 100% (6/6), 1.25 KiB | 213.00 KiB/s, done.

$ cd devopsAutomations/
$ ls
README.md
$ git checkout wia-useradd
Branch 'wia-useradd' set up to track remote branch 'wia-useradd' from 'origin'.
Switched to a new branch 'wia-useradd'
$ ls
README.md azure-pipelines.yml
$ code .
We will need a couple pieces of info first.
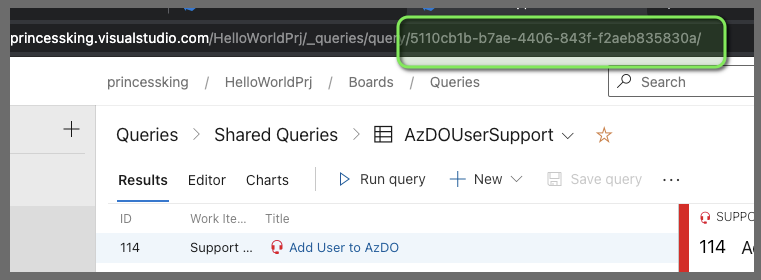
First we need the work item query ID which we can get from the URL
We also need the Pipeline ID for the semaphore code

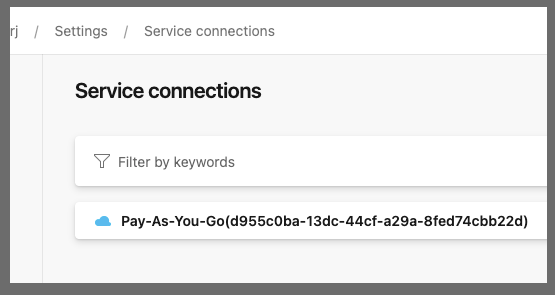
The Azure CLI needs a subscription (however no privs need to be assigned, this is just so we can use the az devops commands)
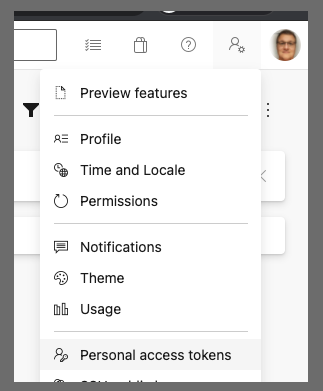
We will need to user our PAT or an elevated service account - one that can both query the work items AND add users..
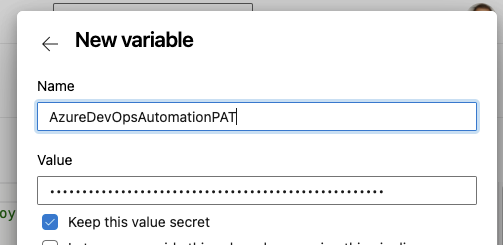
Secrets Management is a whole lengthy topic. You can use AKV backed libraries or AKV and a Key Vault yaml step. For a demo, i’ll just use the KISS method and save a secret as a secret pipeline variable for the moment
The Pipeline
Let’s work through these parts. For ease, I’ve put these files in GH here: https://github.com/idjohnson/wiqautomations/tree/wia-useradd
First the top of the pipeline definition
trigger:
- wia-adduser

schedules:
- cron: "*/15 * * * *"
 displayName: 15m WI Check
 branches:
  include:
    - wia-adduser
 always: true

pool:
 vmImage: 'ubuntu-18.04'

variables:
- name: Org_Name
 value: 'princessking'
- name: affector
 value: isaac.johnson@gmail.com
- name: LicenseType
 value: express
- name: ThisPipelineID
 value: 80

stages:
 - stage: parse
   jobs:
     - job: parse_work_item
       variables:
         job_supportUserWIQueryID: 5110cb1b-b7ae-4406-843f-f2aeb835830a # AzDOUserSupport
       displayName: start_n_sync
       continueOnError: false
       steps:
         - task: AzureCLI@2
           displayName: 'Azure CLI - wiq AddSPToAzure'
           inputs:
             azureSubscription: 'Pay-As-You-Go(d955c0ba-13dc-44cf-a29a-8fed74cbb22d)'
             scriptType: 'bash'
             scriptLocation: 'inlineScript'
             inlineScript: 'az boards query --organization https://dev.azure.com/$(Org_Name)/ --id $(job_supportUserWIQueryID) -o json | jq ''.[] | .id'' | tr ''\n'' '','' > ids.txt'
           env:
             AZURE_DEVOPS_EXT_PAT: $(AzureDevOpsAutomationPAT)

         - task: AzureCLI@2
           displayName: 'Azure CLI - Pipeline Semaphore'
           inputs:
             azureSubscription: 'Pay-As-You-Go(d955c0ba-13dc-44cf-a29a-8fed74cbb22d)'
             scriptType: bash
             scriptLocation: inlineScript
             inlineScript: 'az pipelines build list --project CRHFDevOps --definition-ids $(ThisPipelineID) --org https://dev.azure.com/$(Org_Name)/ -o table > $(Build.StagingDirectory)/pipelinestate.txt'
           env:
             AZURE_DEVOPS_EXT_PAT: $(AzureDevOpsAutomationPAT)
What this says is we will CI trigger if we update the pipeline. We also will set a schedule to run this every 15 minutes. For a smaller org you may want to do it daily. It depends on your SLOs with your developer community.
I have been using ubuntu-18.04 agents (instead of ubuntu-latest) just because there were some recent outages that involved ubuntu-20.04/latest and I just wanted to avoid issues.
The “affector” will be emailed confirmation. The job_supportUserWIQueryID is used to fetch tickets for this pipeline. Each Automation will use a different query ID. i like to leave a comment on its name for my reference.
The az board query pulls the IDs into a comma separated text file (ids.txt).
We also query for the pipeline state. This is for our semaphore - that is, if we are already running, don’t repeatedly require many iterations (or you risk processing the same tickets over and over and over if something goes slow).
         - bash: |
             #!/bin/bash
             set +x
             # take comma sep list and set a var (remove trailing comma if there)
             echo "##vso[task.setvariable variable=WISTOPROCESS]"`cat ids.txt | sed 's/,$//'` > t.o
             set -x
             cat t.o
           displayName: 'Set WISTOPROCESS'
         - bash: |
            set -x
            export

            set +x

            export IFS=","
            read -a strarr <<< "$(WISTOPROCESS)"

            # Print each value of the array by using the loop
            export tval="{"

            for val in "${strarr[@]}";
            do
              export tval="${tval}'process$val':{'wi':'$val'}, "
            done

            set -x
            echo "... task.setvariable variable=mywis;isOutput=true]$tval" | sed 's/..$/}/'
            set +x
            if [["$(WISTOPROCESS)" == ""]]; then
               echo "##vso[task.setvariable variable=mywis;isOutput=true]{}" > ./t.o
            else
               echo "##vso[task.setvariable variable=mywis;isOutput=true]$tval" | sed 's/..$/}/' > ./t.o
            fi

            # regardless of above, if we detect another queued "notStarted" or "inProgress" job, just die.. dont double process
            # this way if an existing job is taking a while, we just bail out on subsequent builds (gracefully)
            export tVarNS="`cat $(Build.StagingDirectory)/pipelinestate.txt | grep -v $(Build.BuildID) | grep notStarted | head -n1 | tr -d '\n'`"
            export tVarIP="`cat $(Build.StagingDirectory)/pipelinestate.txt | grep -v $(Build.BuildID) | grep inProgress | head -n1 | tr -d '\n'`"

            if [["$tVarNS" == ""]]; then
                echo "No one else is NotStarted"
            else
                echo "##vso[task.setvariable variable=mywis;isOutput=true]{}" > ./t.o
            fi
            if [["$tVarIP" == ""]]; then
                echo "No one else is InProgress"
            else
              echo "##vso[task.setvariable variable=mywis;isOutput=true]{}" > ./t.o
            fi

            set -x
            cat ./t.o

           name: mtrx
           displayName: 'create mywis var'
         - bash: |
            set -x
            export
           displayName: 'debug'
This next block is to set an AzDO pipeline var (WISTOPROCESS) for later reference.
The long block of bash uses a loop to turn that CSV into a JSON block.
E.g. 1234,4567 turns into ‘process1234’:{‘wi’:’1234’},’process4567’:{‘wi’:’4567’}
We need a proper JSON block for the “Matrix” processing later.
The Semaphore block:
            # regardless of above, if we detect another queued "notStarted" or "inProgress" job, just die.. dont double process
            # this way if an existing job is taking a while, we just bail out on subsequent builds (gracefully)
            export tVarNS="`cat $(Build.StagingDirectory)/pipelinestate.txt | grep -v $(Build.BuildID) | grep notStarted | head -n1 | tr -d '\n'`"
            export tVarIP="`cat $(Build.StagingDirectory)/pipelinestate.txt | grep -v $(Build.BuildID) | grep inProgress | head -n1 | tr -d '\n'`"

            if [["$tVarNS" == ""]]; then
                echo "No one else is NotStarted"
            else
                echo "##vso[task.setvariable variable=mywis;isOutput=true]{}" > ./t.o
            fi
            if [["$tVarIP" == ""]]; then
                echo "No one else is InProgress"
            else
              echo "##vso[task.setvariable variable=mywis;isOutput=true]{}" > ./t.o
            fi
This says if we have a pipeline instance in the state of ‘notStarted’ or ‘inProgress’, then set the matrix block to “{}” which is effectively a no-op/null set
The last line then exposes our env var
##vso[task.setvariable variable=mywis;isOutput=true]
We’ll want to add a user like this…
az devops user add --email-id user@company.com --license-type express --organization https://dev.azure.com/princessking/
Add User Script
We can easily write this into an “Add User” script like this:
#!/bin/bash

set +x

# e.g.


if ["$#" -eq 0] ; then
  echo "USAGE: $0 [AzDO PAT] userid Team Project [License type/skip]"
  echo ""
  echo "e.g. $0 PAT user@company.com \"MyProject Team\" MyProject stakeholder"
  echo " * would add user@company to the IAM team in MyProject"
  exit
fi

# to auth to AzDO now (az devops login no longer works)
export AZURE_DEVOPS_EXT_PAT=$1

if [[-n $2]]; then
   echo "user: $2"
fi
if [[-n $3]]; then
   echo "group: $3"
fi
if [[-n $4]]; then
   echo "Project: $4"
fi
if [[-n $5]]; then
   echo "License: $5"
fi

# set security group name
descName="[$4]\\\\$3"

# add user (if there, is ignored)
# express (basic) or stakeholder.. no way to do MSDN yet
if [["$5" == "skip"]] ; then
  echo "Skipping user add/license"
else
  az devops user add --email-id $2 --license-type $5 --organization https://dev.azure.com/princessking/
fi

# verify if user is there already
az devops team list-member --organization https://dev.azure.com/princessking/ --project $4 --team "$3" | grep $2

# get sec group id we need
secId=`az devops security group list --organization https://dev.azure.com/princessking/ --project $4 | jq ".graphGroups[] | select(.principalName == \"$descName\") | .descriptor" | sed s/\"//g`

# verification of values
echo "$descName : $secId"

# add user to group (team)
az devops security group membership add --group-id $secId --member-id $2 --organization https://dev.azure.com/princessking/

# proof we added user
az devops team list-member --organization https://dev.azure.com/princessking/ --project $4 --team "$3" | grep $2
We can of course test locally with:
$ ./adduser.sh i *******mypat************************** q Tristan.Cormac.Moriarty@gmail.com "HelloWorldPrj Team" HelloWorldPrj stakeholder
user: Tristan.Cormac.Moriarty@gmail.com
group: HelloWorldPrj Team
Project: HelloWorldPrj
License: stakeholder
{
  "accessLevel": {
    "accountLicenseType": "stakeholder",
    "assignmentSource": "unknown",
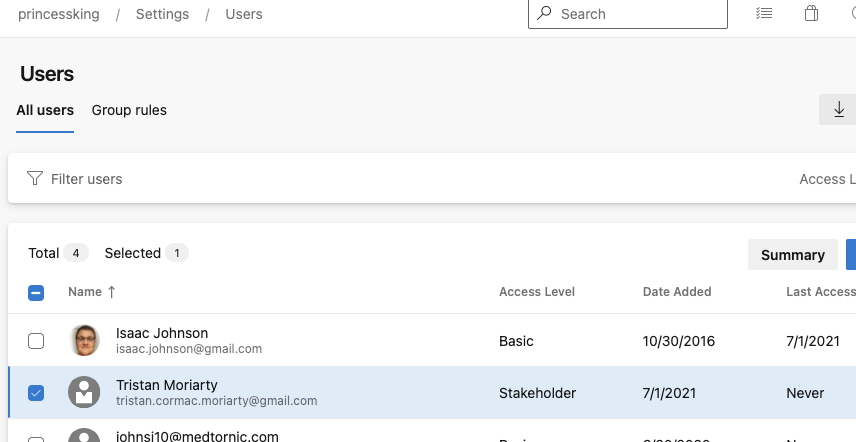
and see the user was added to the Org as a stakeholder:
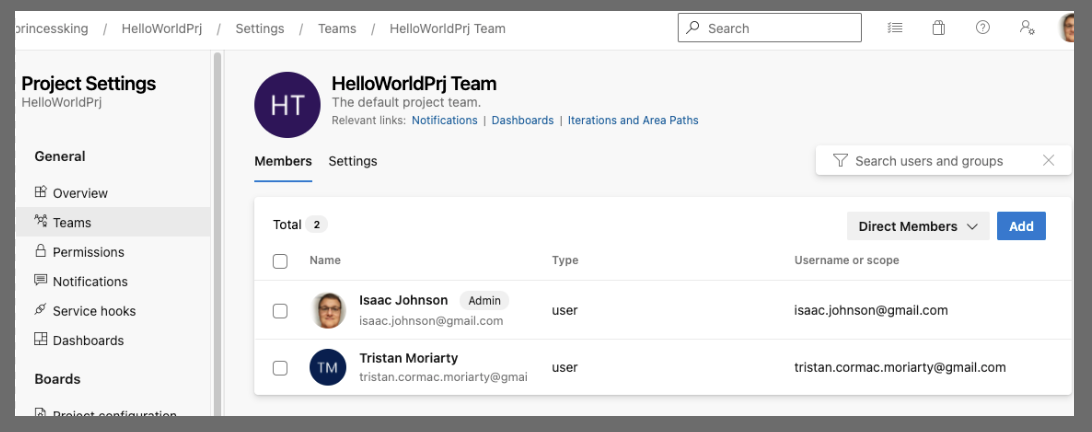
as well as the team
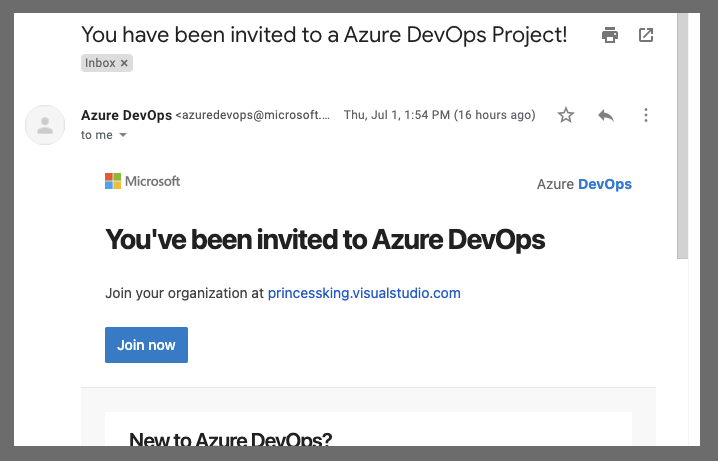
And they received an email as well:
Summary
We used a Work Item Query and a custom type to drive a support ticket system in Azure DevOps. Using a utility pipeline on a timer, we automatically parse and process tickets of a format allowing us to scale to more varied automations over time.
In a production system we would add notifications and error checks (for bad formatting or missing fields). This is fairly easy to add. For instance, one of my existing WIQ automations uses SendGrid to send notices today:
- bash: |
set -x
cat $(Pipeline.Workspace)/out.json
cat $(Pipeline.Workspace)/out.json | sed 's/ / /g' | sed 's/<[^>]*>//g' | sed 's/^"\(.*\)"$/\1/' | sed 's/\"/"/g' | sed 's/.*---//' | jq -r '.email' | tr -d '\n' > email.txt
curl --request POST --url https://api.sendgrid.com/v3/mail/send --header "Authorization: Bearer $(SendGridAPI)" --header 'Content-Type: application/json' --data "{\"personalizations\": [{\"to\": [{\"email\": \"`cat email.txt`\"}]}],\"from\": {\"email\": \"myfirstname@freshbrewed.science\"},\"subject\": \"Processed Request WI $(wi)\",\"content\": [{\"type\": \"text/plain\", \"value\": \"Hey me From Azure Pipeline\"}]}"
displayName: 'Send Grid'