

Published: Sep 14, 2020 by Isaac Johnson
Kubeless is another of the popular CNCF recognized Kubernetes Serverless offerings. It’s a Bitnami supported project that has been around since late 2016. It bills itself as “a Kubernetes-native serverless framework that lets you deploy small bits of code (functions) without having to worry about the underlying infrastructure”. As we dig in, we’ll see it supports quite a lot of languages with some rather compelling features.
Gettings Started
First, we’ll want to create resource group to host our cluster.
$ az group create --name idjkubelessrg --location centralus
{
  "id": "/subscriptions/7d0fa4d1-a3d9-4310-8483-8884cd439962/resourceGroups/idjkubelessrg",
  "location": "centralus",
  "managedBy": null,
  "name": "idjkubelessrg",
  "properties": {
    "provisioningState": "Succeeded"
  },
  "tags": null,
  "type": "Microsoft.Resources/resourceGroups"
}
Next we should create a service principal as an identity for our cluster to leverage.
$ az ad sp create-for-rbac -n idjkubelesssp --skip-assignme
nt --output json > my_sp.json
Changing "idjkubelesssp" to a valid URI of "http://idjkubelesssp", which is the required format used for service principal names

$ export SP_PASS=`cat my_sp.json | jq -r .password`
$ export SP_ID=`cat my_sp.json | jq -r .appId`
Our last step is to create the AKS cluster:
$ az aks create --resource-group idjkubelessrg --name idjkubelessaks --location centralus --node-count 3 --enable-cluster-autoscaler --min-count 2 --max-count 4 --generate-ssh-keys --network-plugin azure --network-policy azure --service-principal $SP_ID --client-secret $SP_PASS
{
  "aadProfile": null,
  "addonProfiles": {
    "kubedashboard": {
      "config": null,
      "enabled": true,
      "identity": null
    }
  },
  "agentPoolProfiles": [
    {
      "availabilityZones": null,
      "count": 3,
      "enableAutoScaling": true,
      "enableNodePublicIp": null,
      "maxCount": 4,
      "maxPods": 30,
      "minCount": 2,
      "name": "nodepool1",
      "nodeLabels": null,
      "nodeTaints": null,
      "orchestratorVersion": "1.16.13",
      "osDiskSizeGb": 128,
      "osType": "Linux",
      "provisioningState": "Succeeded",
      "scaleSetEvictionPolicy": null,
      "scaleSetPriority": null,
      "tags": null,
      "type": "VirtualMachineScaleSets",
      "vmSize": "Standard_DS2_v2",
      "vnetSubnetId": null
    }
  ],
  "apiServerAccessProfile": null,
  "dnsPrefix": "idjkubeles-idjkubelessrg-70b42e",
  "enablePodSecurityPolicy": null,
  "enableRbac": true,
  "fqdn": "idjkubeles-idjkubelessrg-70b42e-ca330874.hcp.centralus.azmk8s.io",
  "id": "/subscriptions/7d0fa4d1-a3d9-4310-8483-8884cd439962/resourcegroups/idjkubelessrg/providers/Microsoft.ContainerService/managedClusters/idjkubelessaks",
  "identity": null,
  "identityProfile": null,
  "kubernetesVersion": "1.16.13",
  "linuxProfile": {
    "adminUsername": "azureuser",
    "ssh": {
      "publicKeys": [
        {
          "keyData": "ssh-rsa AAAAB3NzaC1yc2EAAAADAQABAAABAQDHZ3iOnMMLkiltuikXSjqudfCHmQvIjBGMOuGk6wedwG8Xai3uv0M/X3Z2LS6Ac8tComKEKg7Zje2KFBnvBJvU5JqkTwNHnmp682tXf15EYgn4tB7MDz5DUARpcUXJbYfUg8yPUDveYHw8PEm1n+1MvLJN0ftvdORG5CQQEl/m7jErbJJQI70xg7C8/HG5GmJpIQjDl7UVsJANKab/2/bbUlG1Sqp4cQ/LwxKxQ6/QK/HVauxDkudoTkFLqukLWVjHvNZD37MC/wygSsEVYF+yrkNJySlNbMk4ZNmMwva1yLX8Shhr8G4wWe8QI9Ska8B0keSIu8fzRWxXAv2gB3xB"
        }
      ]
    }
  },
  "location": "centralus",
  "maxAgentPools": 10,
  "name": "idjkubelessaks",
  "networkProfile": {
    "dnsServiceIp": "10.0.0.10",
    "dockerBridgeCidr": "172.17.0.1/16",
    "loadBalancerProfile": {
      "allocatedOutboundPorts": null,
      "effectiveOutboundIps": [
        {
          "id": "/subscriptions/7d0fa4d1-a3d9-4310-8483-8884cd439962/resourceGroups/MC_idjkubelessrg_idjkubelessaks_centralus/providers/Microsoft.Network/publicIPAddresses/e82135a1-5d39-4878-af5a-3b569a7edc43",
          "resourceGroup": "MC_idjkubelessrg_idjkubelessaks_centralus"
        }
      ],
      "idleTimeoutInMinutes": null,
      "managedOutboundIps": {
        "count": 1
      },
      "outboundIpPrefixes": null,
      "outboundIps": null
    },
    "loadBalancerSku": "Standard",
    "networkPlugin": "azure",
    "networkPolicy": "azure",
    "outboundType": "loadBalancer",
    "podCidr": null,
    "serviceCidr": "10.0.0.0/16"
  },
  "nodeResourceGroup": "MC_idjkubelessrg_idjkubelessaks_centralus",
  "privateFqdn": null,
  "provisioningState": "Succeeded",
  "resourceGroup": "idjkubelessrg",
  "servicePrincipalProfile": {
    "clientId": "f726335d-6051-47d4-b8ce-f15283d3e407",
    "secret": null
  },
  "tags": null,
  "type": "Microsoft.ContainerService/ManagedClusters",
  "windowsProfile": {
    "adminPassword": null,
    "adminUsername": "azureuser"
  }
}
Verify
We can verify our config by checking the node pool.
$ rm ~/.kube/config && az aks get-credentials -n idjkubelessaks -g idjkubelessrg --admin
Merged "idjkubelessaks-admin" as current context in /home/builder/.kube/config

$ kubectl get nodes
NAME STATUS ROLES AGE VERSION
aks-nodepool1-35016569-vmss000000 Ready agent 2m10s v1.16.13
aks-nodepool1-35016569-vmss000001 Ready agent 2m17s v1.16.13
aks-nodepool1-35016569-vmss000002 Ready agent 2m6s v1.16.13
Kubeless Install
To install Kubeless we first need to create a namespace and install Kubeless which includes the RBAC Roles/Service account, CRDs, Configmap and controller.
$ export RELEASE=$(curl -s https://api.github.com/repos/kubeless/kubeless/releases/latest | grep tag_name | cut -d '"' -f 4)
$ kubectl create ns kubeless
namespace/kubeless created
$ kubectl create -f https://github.com/kubeless/kubeless/releases/download/$RELEASE/kubeless-$RELEASE.yaml
clusterrole.rbac.authorization.k8s.io/kubeless-controller-deployer created
clusterrolebinding.rbac.authorization.k8s.io/kubeless-controller-deployer created
customresourcedefinition.apiextensions.k8s.io/functions.kubeless.io created
customresourcedefinition.apiextensions.k8s.io/httptriggers.kubeless.io created
customresourcedefinition.apiextensions.k8s.io/cronjobtriggers.kubeless.io created
configmap/kubeless-config created
deployment.apps/kubeless-controller-manager created
serviceaccount/controller-acct created
Verify
We can see it was installed properly by checking the namespace and CRDs
$ kubectl get pods -n kubeless
NAME READY STATUS RESTARTS AGE
kubeless-controller-manager-7ccdccb78b-zsfdt 3/3 Running 0 55s
$ kubectl get deployment -n kubeless
NAME READY UP-TO-DATE AVAILABLE AGE
kubeless-controller-manager 1/1 1 1 69s
$ kubectl get customresourcedefinition
NAME CREATED AT
cronjobtriggers.kubeless.io 2020-09-11T01:48:18Z
functions.kubeless.io 2020-09-11T01:48:18Z
httptriggers.kubeless.io 2020-09-11T01:48:18Z
Install the CLI
To use Kubeless we need a local binary for our OS. Since we are using WSL, we’ll install the linux binary.
$ export OS=$(uname -s| tr '[:upper:]' '[:lower:]')
$ curl -OL https://github.com/kubeless/kubeless/releases/download/$RELEASE/kubeless_$OS-amd64.zip
  % Total % Received % Xferd Average Speed Time Time Time Current
                                 Dload Upload Total Spent Left Speed
100 648 100 648 0 0 1765 0 --:--:-- --:--:-- --:--:-- 1765
100 9774k 100 9774k 0 0 5814k 0 0:00:01 0:00:01 --:--:-- 11.7M
$ unzip kubeless_$OS-amd64.zip
Archive: kubeless_linux-amd64.zip
   creating: bundles/kubeless_linux-amd64/
  inflating: bundles/kubeless_linux-amd64/kubeless
$ sudo mv bundles/kubeless_$OS-amd64/kubeless /usr/local/bin/
[sudo] password for builder:
Hello World
Let’s start with a simple python Hello World function. First, create the python function (Hello World):
$ cat test.py
def hello(event, context):
  print event
  return event['data']
Then deploy the file.
$ kubeless function deploy hello --runtime python2.7 --from-file test.py --handler test.hello
INFO[0001] Deploying function...
INFO[0002] Function hello submitted for deployment
INFO[0002] Check the deployment status executing 'kubeless function ls hello'
We can see it’s now installed and available.
$ kubeless function ls
NAME NAMESPACE HANDLER RUNTIME DEPENDENCIES STATUS
hello default test.hello python2.7 1/1 READY
We can test the function by passing a string to it:
$ kubeless function call hello --data 'Hello world!'
Hello world!
You can also proxy the function and trigger the same thing:
$ kubectl proxy -p 8080 &
$ curl -L --data '{"Another": "Echo"}' --header "Content-Type:application/json" localhost:8080/api/v1/namespaces/default/services/hello:http-function-port/proxy/
{"Another": "Echo"}
We can now remove the function and verify it’s gone. This step removes the behind-the-scenes pod deployment so we will see the pod terminated and removed from the cluster as well.
$ kubeless function delete hello
$ kubeless function ls
NAME NAMESPACE HANDLER RUNTIME DEPENDENCIES STATUS
NodeJS
Let’s try another common serverless language; NodeJS:
Here, we can try another great feature of Kubeless : deploying code with just a YAML:
$ cat function.yaml
---
apiVersion: kubeless.io/v1beta1
kind: Function
metadata:
  name: hello
spec:
  handler: handler.hello
  runtime: nodejs6
  function: |
      module.exports = {
        hello: function(event, context) {
          return 'Hello World'
        }
      }
We apply it and see the function is launched:
$ kubectl apply -f function.yaml
function.kubeless.io/hello created
$ kubeless function ls
NAME NAMESPACE HANDLER RUNTIME DEPENDENCIES STATUS
hello default handler.hello nodejs6 1/1 READY
As before, we can call to get the return value:
$ kubeless function call hello
Hello World
$ kubectl delete -f function.yaml
function.kubeless.io "hello" deleted
We can see the pods getting removed as soon as we delete a function:
$ kubectl get pods --all-namespaces
NAMESPACE NAME READY STATUS RESTARTS AGE
default hello-6d8bf9d6f4-94k42 1/1 Running 0 3m2s

$ kubectl delete -f function1.yaml
function.kubeless.io "hello" deleted

$ kubectl get pods --all-namespaces
NAMESPACE NAME READY STATUS RESTARTS AGE
default hello-6d8bf9d6f4-94k42 0/1 Terminating 0 3m32s

$ kubectl get pods
No resources found in default namespace.
We can also deploy a zip of files. This is handy when writing re-usable functions and libraries. Here we will package and deploy the example functions from Kubeless’ github page: https://github.com/kubeless/kubeless/tree/master/examples
$ cp helloFunctions.zip tmp
$ cd tmp
$ unzip helloFunctions.zip
Archive: helloFunctions.zip
  inflating: helloget.js
  inflating: hellowithdata.js
  inflating: hellowithdeps.js
  inflating: index.js
Here we set the “handler” (or main) and the zip to use:
$ kubeless function deploy get-nodejs-multi --runtime nodejs10 --handler index.helloGet --from-file helloFunctions.zip
INFO[0000] Deploying function...
INFO[0000] Function get-nodejs-multi submitted for deployment
INFO[0000] Check the deployment status executing 'kubeless function ls get-nodejs-multi'

$ kubeless function ls
NAME NAMESPACE HANDLER RUNTIME DEPENDENCIES STATUS
get-nodejs-multi default index.helloGet nodejs10 1/1 READY

$ kubeless function call get-nodejs-multi
hello world!
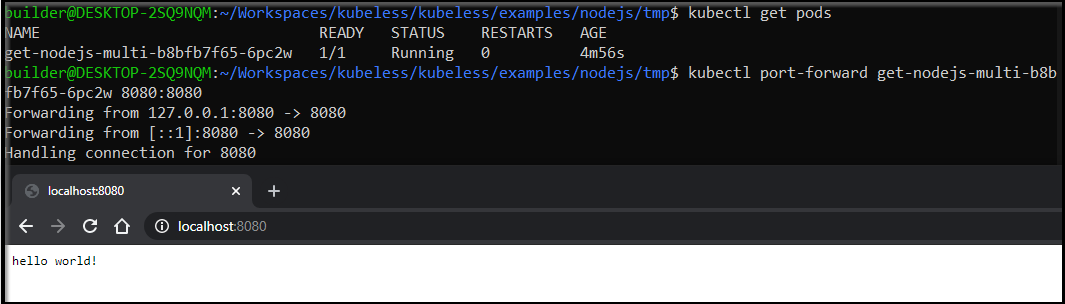
Like any container, we can port-forward if our language is exposed on a common port (as ExpressJS is on 8080).
We can port-forward to the pod on 8080 and see the same results:
$ kubectl get pods
NAME READY STATUS RESTARTS AGE
get-nodejs-multi-b8bfb7f65-6pc2w 1/1 Running 0 4m56s
$ kubectl port-forward get-nodejs-multi-b8bfb7f65-6pc2w 8080:8080
Forwarding from 127.0.0.1:8080 -> 8080
Forwarding from [::1]:8080 -> 8080
Handling connection for 8080
Kubeless Service
We can get the underlying service for kubeless as well:
$ kubectl get svc
NAME TYPE CLUSTER-IP EXTERNAL-IP PORT(S) AGE
get-nodejs-multi ClusterIP 10.0.55.145 <none> 8080/TCP 8m15s
kubernetes ClusterIP 10.0.0.1 <none> 443/TCP 74m
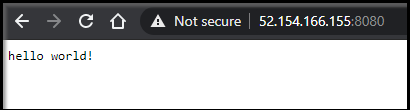
With AKS, we can easily expose a known deployment or service with a loadbalancer to expose it to external traffic:
$ kubectl expose svc get-nodejs-multi --type=LoadBalancer --name=nodejssvc
service/nodejssvc exposed

$ kubectl get svc
NAME TYPE CLUSTER-IP EXTERNAL-IP PORT(S) AGE
get-nodejs-multi ClusterIP 10.0.55.145 <none> 8080/TCP 11m
kubernetes ClusterIP 10.0.0.1 <none> 443/TCP 78m
nodejssvc LoadBalancer 10.0.222.64 52.154.166.155 8080:31203/TCP 66s
We can now see the service exposed: http://52.154.166.155:8080/
Because we get a service, a replicaset and thus a resilient pod, we have, in effect, a full deployment.
$ kubectl get rs
NAME DESIRED CURRENT READY AGE
get-nodejs-multi-b8bfb7f65 1 1 1 15m

$ kubectl describe deployments get-nodejs-m
ulti
Name: get-nodejs-multi
Namespace: default
CreationTimestamp: Thu, 10 Sep 2020 21:47:15 -0500
Labels: created-by=kubeless
                        function=get-nodejs-multi
Annotations: deployment.kubernetes.io/revision: 1
Selector: created-by=kubeless,function=get-nodejs-multi
Replicas: 1 desired | 1 updated | 1 total | 1 available | 0 unavailable
StrategyType: RollingUpdate
MinReadySeconds: 0
RollingUpdateStrategy: 0 max unavailable, 25% max surge
Pod Template:
  Labels: created-by=kubeless
                function=get-nodejs-multi
  Annotations: prometheus.io/path: /metrics
                prometheus.io/port: 8080
                prometheus.io/scrape: true
  Init Containers:
   prepare:
    Image: kubeless/unzip@sha256:4863100364496255de9bf8722a220dad7143ab277ac72435876eb8c93936e9d7
    Port: <none>
    Host Port: <none>
    Command:
      sh
      -c
    Args:
      base64 -d < /src/index > /tmp/func.decoded && echo 'd1f84e9f0a8ce27e7d9ce6f457126a8f92e957e5109312e7996373f658015547 /tmp/func.decoded' > /tmp/func.sha256 && sha256sum -c /tmp/func.sha256 && unzip -o /tmp/func.decoded -d /kubeless && cp /src/package.json /kubeless
    Environment: <none>
    Mounts:
      /kubeless from get-nodejs-multi (rw)
      /src from get-nodejs-multi-deps (rw)
  Containers:
   get-nodejs-multi:
    Image: kubeless/nodejs@sha256:74f8428ba9e98b6849ab34d2d1b5c38381b1de471090f7cc3dc9f72322f8c921
    Port: 8080/TCP
    Host Port: 0/TCP
    Liveness: http-get http://:8080/healthz delay=3s timeout=1s period=30s #success=1 #failure=3
    Environment:
      FUNC_HANDLER: helloGet
      MOD_NAME: index
      FUNC_TIMEOUT: 180
      FUNC_RUNTIME: nodejs10
      FUNC_MEMORY_LIMIT: 0
      FUNC_PORT: 8080
      KUBELESS_INSTALL_VOLUME: /kubeless
      NODE_PATH: $(KUBELESS_INSTALL_VOLUME)/node_modules
    Mounts:
      /kubeless from get-nodejs-multi (rw)
  Volumes:
   get-nodejs-multi:
    Type: EmptyDir (a temporary directory that shares a pod's lifetime)
    Medium:
    SizeLimit: <unset>
   get-nodejs-multi-deps:
    Type: ConfigMap (a volume populated by a ConfigMap)
    Name: get-nodejs-multi
    Optional: false
Conditions:
  Type Status Reason
  ---- ------ ------
  Available True MinimumReplicasAvailable
  Progressing True NewReplicaSetAvailable
OldReplicaSets: <none>
NewReplicaSet: get-nodejs-multi-b8bfb7f65 (1/1 replicas created)
Events:
  Type Reason Age From Message
  ---- ------ ---- ---- -------
  Normal ScalingReplicaSet 17m deployment-controller Scaled up replica set get-nodejs-multi-b8bfb7f65 to 1
Language support
Kubeless supports quite a few languages. We can see the current list supported on our deployment:
$ kubeless get-server-config
INFO[0000] Current Server Config:
INFO[0000] Supported Runtimes are: ballerina0.981.0, dotnetcore2.0, dotnetcore2.1, dotnetcore2.2, dotnetcore3.1, go1.13, go1.14, java1.8, java11, nodejs6, nodejs8, nodejs10, nodejs12, php7.2, php7.3, python2.7, python3.4, python3.6, python3.7, ruby2.3, ruby2.4, ruby2.5, ruby2.6, jvm1.8, nodejs_distroless8, nodejsCE8, vertx1.8
Topics / Message Queues
We can create topics and trigger functions from topics. This is great if we wish to have a single stack that is processed by one or more functions.
First we need to create a Kafka topic provider in kubeless:
$ export KAFKARELEASE=$(curl -s https://api.git
hub.com/repos/kubeless/kafka-trigger/releases/latest | grep tag_name | cut -d '"' -f 4)


$ kubectl create -f https://github.com/kubeless/kafka-trigger/releases/download/$KAFKARELEASE/kafka-zookeeper-$KAFKARELEASE.yaml
service/zoo created
service/zookeeper created
deployment.apps/kafka-trigger-controller created
clusterrole.rbac.authorization.k8s.io/kafka-controller-deployer created
clusterrolebinding.rbac.authorization.k8s.io/kafka-controller-deployer created
service/kafka created
customresourcedefinition.apiextensions.k8s.io/kafkatriggers.kubeless.io created
service/broker created
statefulset.apps/kafka created
statefulset.apps/zoo created
Once running, we can verify the stateful set and services are up:
$ kubectl -n kubeless get statefulset
NAME READY AGE
kafka 1/1 69s
zoo 1/1 69s

$ kubectl -n kubeless get svc
NAME TYPE CLUSTER-IP EXTERNAL-IP PORT(S) AGE
broker ClusterIP None <none> 9092/TCP 79s
kafka ClusterIP 10.0.108.8 <none> 9092/TCP 79s
zoo ClusterIP None <none> 9092/TCP,3888/TCP 80s
zookeeper ClusterIP 10.0.19.44 <none> 2181/TCP 80s
Next we create a basic function to show the item in the topic:
$ cat test.py
def foobar(event, context):
  print event['data']
  return event['data']

$ kubeless function deploy test --runtime python2.7 --handler test.foobar --from-file test.py
INFO[0001] Deploying function...
INFO[0001] Function test submitted for deployment
INFO[0001] Check the deployment status executing 'kubeless function ls test'
Lastly, we create a topic and assign a trigger:
$ kubeless trigger kafka create test --function
-selector created-by=kubeless,function=test --trigger-topic test-topic
INFO[0000] Kafka trigger test created in namespace default successfully!
Now we can publish to the topic and verify the pod was triggered by looking at the log:
$ kubeless topic publish --topic test-topic --data 'Howdy Howdy'
$ kubeless topic publish --topic test-topic --data 'And Another One'
$ kubectl get pods
NAME READY STATUS RESTARTS AGE
get-nodejs-multi-b8bfb7f65-6pc2w 1/1 Running 0 30m
test-77f67c86c4-t74x8 1/1 Running 0 2m56s
the log:
$ kubectl logs test-77f67c86c4-t74x8
Bottle v0.12.13 server starting up (using CherryPyServer())...
Listening on http://0.0.0.0:8080/
Hit Ctrl-C to quit.

10.240.0.35 - - [11/Sep/2020:03:15:15 +0000] "GET /healthz HTTP/1.1" 200 2 "" "kube-probe/1.16" 0/185
10.240.0.35 - - [11/Sep/2020:03:15:45 +0000] "GET /healthz HTTP/1.1" 200 2 "" "kube-probe/1.16" 0/118
10.240.0.35 - - [11/Sep/2020:03:16:15 +0000] "GET /healthz HTTP/1.1" 200 2 "" "kube-probe/1.16" 0/91
10.240.0.35 - - [11/Sep/2020:03:16:45 +0000] "GET /healthz HTTP/1.1" 200 2 "" "kube-probe/1.16" 0/97
10.240.0.35 - - [11/Sep/2020:03:17:15 +0000] "GET /healthz HTTP/1.1" 200 2 "" "kube-probe/1.16" 0/126
10.240.0.42 - - [11/Sep/2020:03:17:15 +0000] "POST / HTTP/1.1" 200 11 "" "Go-http-client/1.1" 0/6576
Howdy Howdy
10.240.0.42 - - [11/Sep/2020:03:17:24 +0000] "POST / HTTP/1.1" 200 15 "" "Go-http-client/1.1" 0/4736
And Another One
You can checkout more (including using NATS instead of Kakfa) here: https://kubeless.io/docs/pubsub-functions/
Checking available topics
$ kubeless topic list
__consumer_offsets
test-topic
Cronjobs / Scheduled Functions
We can also create cronjobs:
$ kubeless trigger cronjob create fiveminutetimer --function test --payload TestFromCron --schedule '*/5
 * * * *'
INFO[0000] Cronjob trigger fiveminutetimer created in namespace default successfully!


$ kubectl logs test-77f67c86c4-t74x8
Bottle v0.12.13 server starting up (using CherryPyServer())...
Listening on http://0.0.0.0:8080/
Hit Ctrl-C to quit.

10.240.0.35 - - [11/Sep/2020:03:15:15 +0000] "GET /healthz HTTP/1.1" 200 2 "" "kube-probe/1.16" 0/185
10.240.0.35 - - [11/Sep/2020:03:15:45 +0000] "GET /healthz HTTP/1.1" 200 2 "" "kube-probe/1.16" 0/118
10.240.0.35 - - [11/Sep/2020:03:16:15 +0000] "GET /healthz HTTP/1.1" 200 2 "" "kube-probe/1.16" 0/91
10.240.0.35 - - [11/Sep/2020:03:16:45 +0000] "GET /healthz HTTP/1.1" 200 2 "" "kube-probe/1.16" 0/97
10.240.0.35 - - [11/Sep/2020:03:17:15 +0000] "GET /healthz HTTP/1.1" 200 2 "" "kube-probe/1.16" 0/126
10.240.0.42 - - [11/Sep/2020:03:17:15 +0000] "POST / HTTP/1.1" 200 11 "" "Go-http-client/1.1" 0/6576
Howdy Howdy
10.240.0.42 - - [11/Sep/2020:03:17:24 +0000] "POST / HTTP/1.1" 200 15 "" "Go-http-client/1.1" 0/4736
And Another One
10.240.0.35 - - [11/Sep/2020:03:17:45 +0000] "GET /healthz HTTP/1.1" 200 2 "" "kube-probe/1.16" 0/262
10.240.0.35 - - [11/Sep/2020:03:18:15 +0000] "GET /healthz HTTP/1.1" 200 2 "" "kube-probe/1.16" 0/128
10.240.0.35 - - [11/Sep/2020:03:18:45 +0000] "GET /healthz HTTP/1.1" 200 2 "" "kube-probe/1.16" 0/95
10.240.0.35 - - [11/Sep/2020:03:19:15 +0000] "GET /healthz HTTP/1.1" 200 2 "" "kube-probe/1.16" 0/167
10.240.0.35 - - [11/Sep/2020:03:19:45 +0000] "GET /healthz HTTP/1.1" 200 2 "" "kube-probe/1.16" 0/101
10.240.0.35 - - [11/Sep/2020:03:20:15 +0000] "GET /healthz HTTP/1.1" 200 2 "" "kube-probe/1.16" 0/122
10.240.0.35 - - [11/Sep/2020:03:20:45 +0000] "GET /healthz HTTP/1.1" 200 2 "" "kube-probe/1.16" 0/129
10.240.0.35 - - [11/Sep/2020:03:21:15 +0000] "GET /healthz HTTP/1.1" 200 2 "" "kube-probe/1.16" 0/126
10.240.0.35 - - [11/Sep/2020:03:21:45 +0000] "GET /healthz HTTP/1.1" 200 2 "" "kube-probe/1.16" 0/92
10.240.0.35 - - [11/Sep/2020:03:22:15 +0000] "GET /healthz HTTP/1.1" 200 2 "" "kube-probe/1.16" 0/69
10.240.0.35 - - [11/Sep/2020:03:22:45 +0000] "GET /healthz HTTP/1.1" 200 2 "" "kube-probe/1.16" 0/128
10.240.0.35 - - [11/Sep/2020:03:23:15 +0000] "GET /healthz HTTP/1.1" 200 2 "" "kube-probe/1.16" 0/84
10.240.0.35 - - [11/Sep/2020:03:23:45 +0000] "GET /healthz HTTP/1.1" 200 2 "" "kube-probe/1.16" 0/86
10.240.0.35 - - [11/Sep/2020:03:24:15 +0000] "GET /healthz HTTP/1.1" 200 2 "" "kube-probe/1.16" 0/90
10.240.0.35 - - [11/Sep/2020:03:24:45 +0000] "GET /healthz HTTP/1.1" 200 2 "" "kube-probe/1.16" 0/132
10.240.0.73 - - [11/Sep/2020:03:25:07 +0000] "GET / HTTP/1.1" 200 0 "" "curl/7.52.1" 0/4691

10.240.0.35 - - [11/Sep/2020:03:25:15 +0000] "GET /healthz HTTP/1.1" 200 2 "" "kube-probe/1.16" 0/119
10.240.0.35 - - [11/Sep/2020:03:25:45 +0000] "GET /healthz HTTP/1.1" 200 2 "" "kube-probe/1.16" 0/171
10.240.0.35 - - [11/Sep/2020:03:26:15 +0000] "GET /healthz HTTP/1.1" 200 2 "" "kube-probe/1.16" 0/85
10.240.0.35 - - [11/Sep/2020:03:26:45 +0000] "GET /healthz HTTP/1.1" 200 2 "" "kube-probe/1.16" 0/127
10.240.0.35 - - [11/Sep/2020:03:27:15 +0000] "GET /healthz HTTP/1.1" 200 2 "" "kube-probe/1.16" 0/94
10.240.0.35 - - [11/Sep/2020:03:27:45 +0000] "GET /healthz HTTP/1.1" 200 2 "" "kube-probe/1.16" 0/85
10.240.0.72 - - [11/Sep/2020:03:28:08 +0000] "GET / HTTP/1.1" 200 0 "" "curl/7.52.1" 0/6087

10.240.0.35 - - [11/Sep/2020:03:28:15 +0000] "GET /healthz HTTP/1.1" 200 2 "" "kube-probe/1.16" 0/159
10.240.0.35 - - [11/Sep/2020:03:28:45 +0000] "GET /healthz HTTP/1.1" 200 2 "" "kube-probe/1.16" 0/123
10.240.0.89 - - [11/Sep/2020:03:29:08 +0000] "GET / HTTP/1.1" 200 0 "" "curl/7.52.1" 0/6711

10.240.0.35 - - [11/Sep/2020:03:29:15 +0000] "GET /healthz HTTP/1.1" 200 2 "" "kube-probe/1.16" 0/158
I tried adding a payload as a map, to no effect
$ kubectl get CronJobTrigger onemintimer -o yaml | tail -n 5
spec:
  function-name: test
  payload:
    hello: buddies
  schedule: '* * * * *'
From what i can tell, the payload is ignored. It seems to be a recent feature so perhaps it will be fixed in future release.
Kubeless UI
Kubeless has a nice test-framework UI for those that prefer a GUI for interactive testing.
Kubeless has a nice test-framework UI for those that prefer a GUI for interactive testing.
Deployment:
$ kubectl create -f https://raw.githubusercontent.com/kubeless/kubeless-ui/master/k8s.yaml
serviceaccount/ui-acct created
clusterrole.rbac.authorization.k8s.io/kubeless-ui created
clusterrolebinding.rbac.authorization.k8s.io/kubeless-ui created
deployment.apps/ui created
service/ui created
Proxy:
$ kubectl port-forward ui-794f985587-4fb8r -n kubeless 3000:3000
Forwarding from 127.0.0.1:3000 -> 3000
Forwarding from [::1]:3000 -> 3000
Handling connection for 3000

We can easily test JSON and plain text payloads with GET and POST to our functions in a handy UI.
You can even edit in the UI and save to see results:
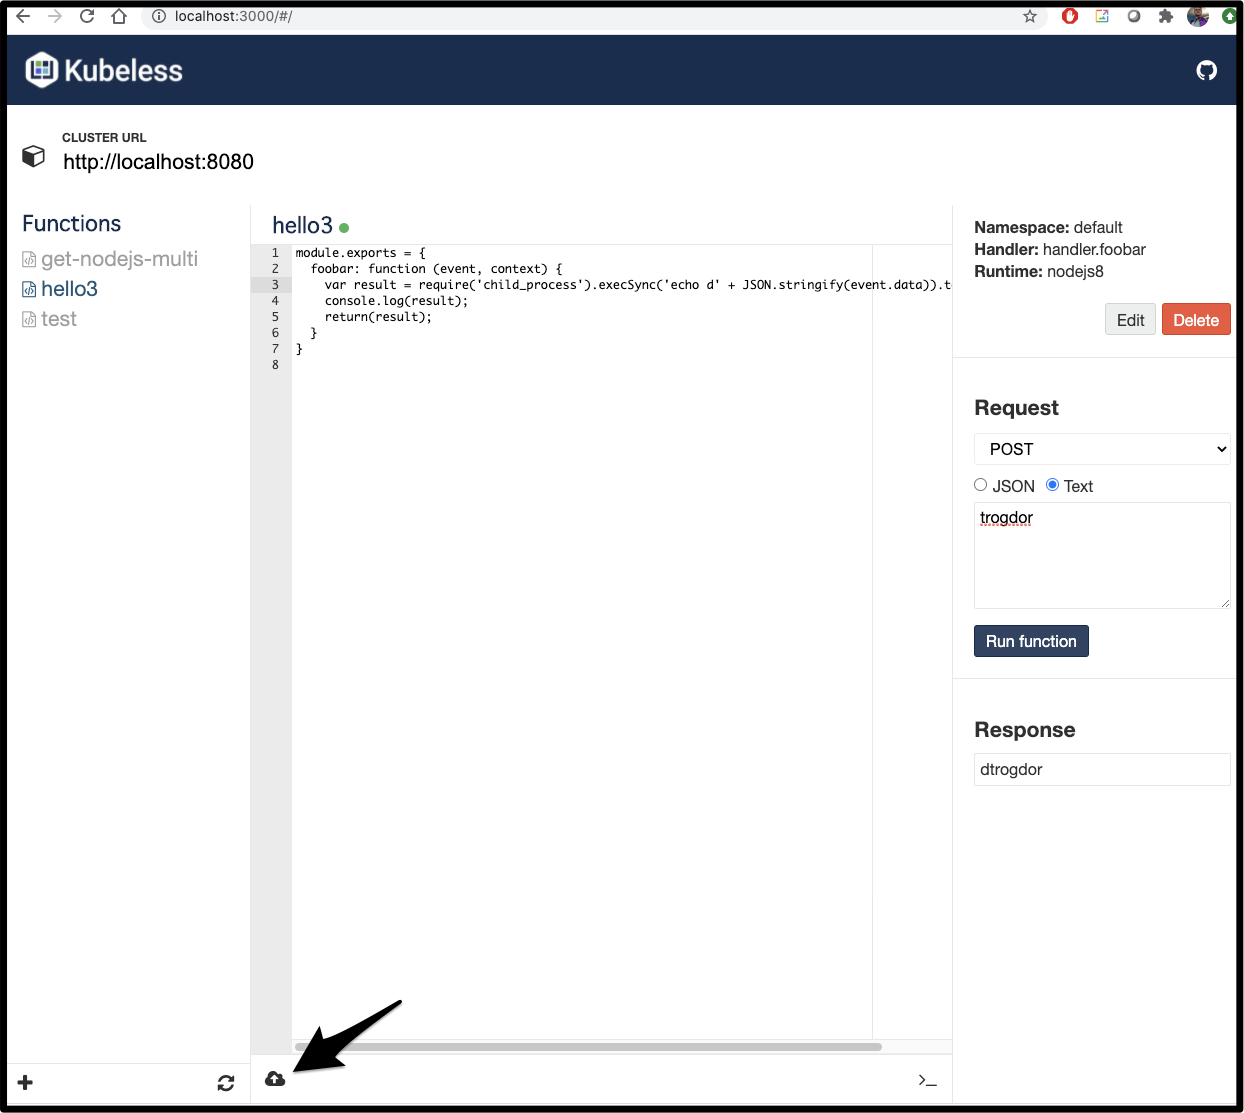
Note: it was not immediate when testing “Run Function” - there is a delay as behind the scenes, the deployment is updated and the former pods is scaled down.
We can also edit the runtime and other details via “edit”:
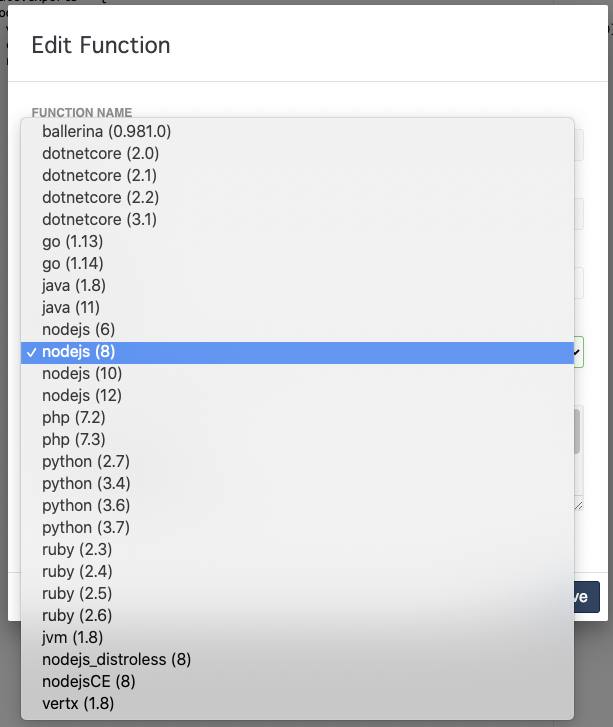
This can be useful for inline editing where one needs to change dependencies (3rd party libraries to pull in).
Perl
For fun, let’s try shelling to perl, for instance, to run a regular expression, and return results.
$ kubectl apply -f function2.yaml
function.kubeless.io/hello3 configured
$ cat function2.yaml
---
apiVersion: kubeless.io/v1beta1
kind: Function
metadata:
  name: hello3
spec:
  handler: handler.foobar
  runtime: nodejs8
  deps: |
      {
          "name": "foobar",
          "version": "0.0.1",
          "dependencies": {
              "child_process": "^1.0.2",
              "end-of-stream": "^1.4.1"
          }
      }
  function: |
      module.exports = {
        foobar: function (event, context) {
          var result = require('child_process').execSync('echo ' + JSON.stringify(event.data) + ' | perl -0777 -pe \'s/^.*:(.*)}$/\\1/s\'').toString();
          return(result);
        }
      }
$ kubeless function call hello3 --data '{"Another":"Echo"}'
Echo
Azure DevOps
I thought, due to its similicity, it would be fun to orchestrate into a multi-stage deployment pipeline. It’s not too fancy. In a production system, i would likely create a stage with a branch gate. But this worked as i enjoyed playing with my regular expression. The code is freely available here: https://github.com/idjohnson/kubeless-perl-cicd
#!/bin/bash

echo $1 | perl -pe 's/^.*:(.*)}$/\1/s'
---
apiVersion: kubeless.io/v1beta1
kind: Function
metadata:
  name: hello3
spec:
  handler: handler.foobar
  runtime: nodejs8
  deps: |
      {
          "name": "foobar",
          "version": "0.0.1",
          "dependencies": {
              "child_process": "^1.0.2",
              "end-of-stream": "^1.4.1"
          }
      }
  function: |
      module.exports = {
        foobar: function (event, context) {
          var result = require('child_process').execSync('echo ' + JSON.stringify(event.data) + ' | perl -0777 -pe \'s/^.*:(.*)}$/\\1/s\'').toString();
          console.log(result);
          return(result);
        }
      }
#!/bin/bash
set +x

# cat the perl_line.sh and pull out the perl statement
#cat perl_line.sh | tail -n1 | sed "s/'/\\\'/g" | sed "s/\$1/'+ JSON.stringify(event.data) + '/" | sed 's/\\/\\\\/g' > t.o
cat perl_line.sh | tail -n1 | sed "s/'/\\\'/g" | sed "s/\$1/'+ JSON.stringify(event.data) + '/" > t.o
# escape for use in RegExp
ESCAPED_REPLACE=$(printf '%s\n' "`cat t.o`" | sed -e 's/[\/&]/\\&/g')

# cat the base one and sub in our bash
cat function.yaml | sed "s/^\(.*\.execSync.'\).*\(...toString.*\)$/\1$ESCAPED_REPLACE\2/" > function_gen.yaml
azure-pipelines:
trigger:
- master

variables:
- group: kconfig
- name: my-passed-variable
  value: $[variables.configp3b64] # uses runtime expression

pool:
  vmImage: 'ubuntu-latest'

steps:
- script: echo Hello, world!
  displayName: 'Run a one-line script'

- script: |
    ./perl_line.sh {'some':'data'}
    ./repl.sh
    cat function_gen.yaml
  displayName: 'test and replace'

- script: |
    echo $KCONFIGP1B64 > kconfig.b64
    echo $KCONFIGP2B64 >> kconfig.b64
    echo $KCONFIGP3B64 >> kconfig.b64
    echo $KCONFIGP4B64 >> kconfig.b64
    cat kconfig.b64 | base64 --decode > $(System.DefaultWorkingDirectory)/kubeconfig
  displayName: 'create kubeconfig'

- task: KubectlInstaller@0
  inputs:
    kubectlVersion: 'latest'

- task: Kubernetes@1
  inputs:
    connectionType: 'None'
    namespace: 'default'
    command: 'get'
    arguments: 'pods --kubeconfig=$(System.DefaultWorkingDirectory)/kubeconfig'
    secretType: 'dockerRegistry'
    containerRegistryType: 'Azure Container Registry'
    outputFormat: 'none'

- script: kubectl get pods --kubeconfig=$(System.DefaultWorkingDirectory)/kubeconfig
  displayName: 'via cli'

- script: kubectl apply -f function_gen.yaml --kubeconfig=$(System.DefaultWorkingDirectory)/kubeconfig
  displayName: 'update'
  condition: always()
  continueOnError: true

- script: |
    export OS=$(uname -s| tr '[:upper:]' '[:lower:]')
    export RELEASE=$(curl -s https://api.github.com/repos/kubeless/kubeless/releases/latest | grep tag_name | cut -d '"' -f 4)
    curl -OL https://github.com/kubeless/kubeless/releases/download/$RELEASE/kubeless_$OS-amd64.zip
    unzip kubeless_$OS-amd64.zip
    export KUBECONFIG=$(System.DefaultWorkingDirectory)/kubeconfig
    sleep 10
    bundles/kubeless_$OS-amd64/kubeless get-server-config
    bundles/kubeless_$OS-amd64/kubeless function call hello3 --data '{"Another":"Echo"}'
  displayName: 'via kubeless'
  condition: always()
  continueOnError: true
Yes, i split a base64 encoded kubeconfig into 4 variables because of Library character limitations. It was a bit of a hack, but i generally don’t commit admin level kubeconfigs to public Github repos…
Comparison to the other tools:
Fission.io, maintained by Platform9, has a few built in environments, but allows one to extend it to any containerized image. For instance, fission can build and push a Perl container with a simple Dockerfile (see this example)
It also creates a pod per environment that scales up when functions are run and down when after use. This makes the cluster very scalable for a small cost on launch time.
However, fission.io has a router and since functions do not persist as services or pods, one cannot work around that by exposing a service. There are guides, but it seems one might have a challenge on https traffic (outside of using something like Consul to wrap it).
KNative, largely supported by Google, is similar, though it requires a bundled service mesh. In our guidewe used Kourier having had issues with Istio. With the service mesh and a service endpoint, we exposed on a DNS but due to the lack of root certs we couldn’t extend courier to let us apply SSL to our functions for subdomains - recall that KNative uses function.router.tld.
KNative has the benefit of scaling to 0 pods, like fission but the service mesh requirement provided some extra challenges. Additionally, you are deploying any container so it’s not the same as Fission and Kubeless that deploy raw code.
Kubeless , maintained by Bitnami, like fission,io deploys code. Unlike fission.io, we have a fixed list of common languages, but they dynamically create containers just based on our code. This has the advantage of making lightweight CICD functions at the cost of container control.
Because Kubeless creates native deployments, pods do stay running consuming resources when not in use, but at the benefit of making it easy to route traffic via a standard nginx ingress. Kubeless also has native message queue and cronjob support for scheduled and forked workloads.
I would recommend this writeup from gravitationalfor another perspective comparing them.
Summary
Kubeless is a powerful serverless suite perfect for running functions in common languages. It’s native creation of deployments makes it easy to tie into other Kubernetes offerings. While it does persist a pod per function, the requirements seem light and I’ll likely pursue this one for my future utility function workloads.