

Published: Mar 17, 2019 by Isaac Johnson
In Part 1 we covered the basics of AKS including installing CLI tools, creating a cluster, installing Helm and launching a stable chart. In Part 2 we will be covering scaling, both veritical and horizontal, some newer features of AKS such as Cluster Auto-Scaling and touch on RBAC and creating a dashboard user.
In our last entry we covered launching and using a small Kubernetes cluster in Azure using AKS. But a one node cluster, while inexpensive, is a bit too slow to really use. AKS makes it easy for us to scale our cluster.
Scaling an AKS cluster
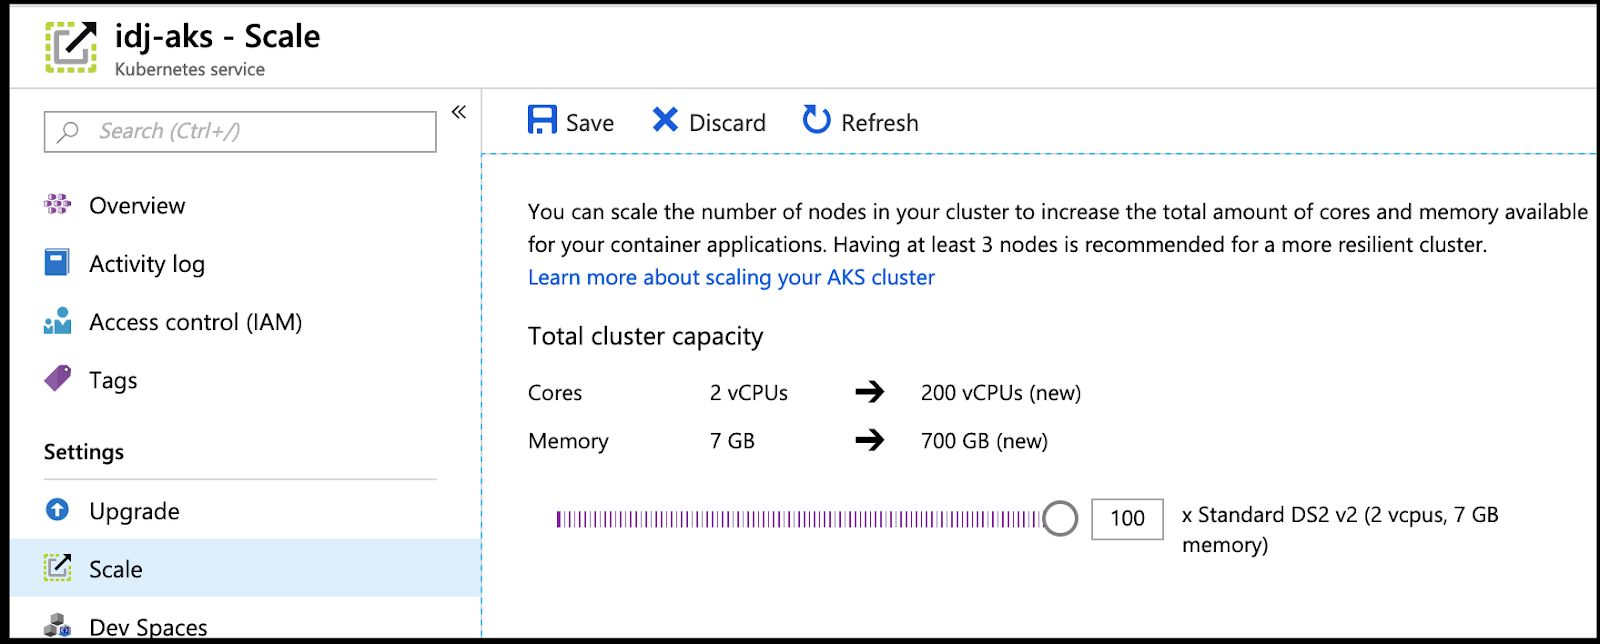
The easiest way is through the portal where we could easily scale to a 100 nodes using the slider under the scale setting:
Scaling with the command line is just as easy.
$ az aks show --resource-group idj-aks --name idj-aks --query agentPoolProfiles
[
  {
    "count": 1,
    "maxPods": 110,
    "name": "agentpool",
    "osDiskSizeGb": 30,
    "osType": "Linux",
    "storageProfile": "ManagedDisks",
    "vmSize": "Standard_DS2_v2"
  }
]

$ az aks scale --resource-group idj-aks --name idj-aks --node-count 3
 - Running ..

{
  "aadProfile": null,
  "addonProfiles": {
    "httpApplicationRouting": {
      "config": null,
      "enabled": false
    },
    "omsagent": {
      "config": {
        "logAnalyticsWorkspaceResourceID": "/subscriptions/d955c0ba-ffff-ffff-ffff-fffffffb22d/resourceGroups/DefaultResourceGroup-EUS/providers/Microsoft.OperationalInsights/workspaces/DefaultWorkspace-d955c0ba-ffff-ffff-ffff-ffffffffb22d-EUS"
      },
      "enabled": true
    }
  },
  "agentPoolProfiles": [
    {
      "count": 3,
      "dnsPrefix": null,
      "fqdn": null,
      "maxPods": 110,
      "name": "agentpool",
      "osDiskSizeGb": 30,
      "osType": "Linux",
      "ports": null,
      "storageProfile": "ManagedDisks",
      "vmSize": "Standard_DS2_v2",
      "vnetSubnetId": null
    }
  ],
  "dnsPrefix": "idj-aks-01",
  "enableRbac": false,
  "fqdn": "idj-aks-01-259d9b82.hcp.centralus.azmk8s.io",
  "id": "/subscriptions/d955c0ba-ffff-ffff-ffff-fffffffb22d/resourcegroups/idj-aks/providers/Microsoft.ContainerService/managedClusters/idj-aks",
  "kubernetesVersion": "1.12.6",
  "linuxProfile": null,
  "location": "centralus",
  "name": "idj-aks",
  "networkProfile": {
    "dnsServiceIp": "10.0.0.10",
    "dockerBridgeCidr": "172.17.0.1/16",
    "networkPlugin": "kubenet",
    "networkPolicy": null,
    "podCidr": "10.244.0.0/16",
    "serviceCidr": "10.0.0.0/16"
  },
  "nodeResourceGroup": "MC_idj-aks_idj-aks_centralus",
  "provisioningState": "Succeeded",
  "resourceGroup": "idj-aks",
  "servicePrincipalProfile": {
    "clientId": "eb011c9e-3d44-4e3e-af80-59639911a101",
    "keyVaultSecretRef": null,
    "secret": null
  },
  "tags": null,
  "type": "Microsoft.ContainerService/ManagedClusters"
}
We can query again, but you can see the changes already reflected in the activity log and scale panes in the portal:


This same process can be used to scale down your cluster. Presently (via comments on the documentation) there appears to be an issue with aks scale (down) immediately terminating nodes and not applying kubectl drain.
$ az aks scale --resource-group idj-aks --name idj-aks --node-count 1

{
  "aadProfile": null,
  "addonProfiles": {
    "httpApplicationRouting": {
      "config": null,
      "enabled": false
    },
    "omsagent": {
      "config": {
        "logAnalyticsWorkspaceResourceID": "/subscriptions/d955c0ba-ffff-ffff-ffff-ffffffffffff/resourceGroups/DefaultResourceGroup-EUS/providers/Microsoft.OperationalInsights/workspaces/DefaultWorkspace-d955c0ba-ffff-ffff-ffff-fffffffb22d-EUS"
      },
      "enabled": true
    }
  },
  "agentPoolProfiles": [
    {
      "count": 1,
      "dnsPrefix": null,
      "fqdn": null,
      "maxPods": 110,
      "name": "agentpool",
      "osDiskSizeGb": 30,
      "osType": "Linux",
      "ports": null,
      "storageProfile": "ManagedDisks",
      "vmSize": "Standard_DS2_v2",
      "vnetSubnetId": null
    }
  ],
  "dnsPrefix": "idj-aks-01",
  "enableRbac": false,
  "fqdn": "idj-aks-01-259d9b82.hcp.centralus.azmk8s.io",
  "id": "/subscriptions/d955c0ba-ffff-ffff-ffff-8fed74cbb22d/resourcegroups/idj-aks/providers/Microsoft.ContainerService/managedClusters/idj-aks",
  "kubernetesVersion": "1.12.6",
  "linuxProfile": null,
  "location": "centralus",
  "name": "idj-aks",
  "networkProfile": {
    "dnsServiceIp": "10.0.0.10",
    "dockerBridgeCidr": "172.17.0.1/16",
    "networkPlugin": "kubenet",
    "networkPolicy": null,
    "podCidr": "10.244.0.0/16",
    "serviceCidr": "10.0.0.0/16"
  },
  "nodeResourceGroup": "MC_idj-aks_idj-aks_centralus",
  "provisioningState": "Succeeded",
  "resourceGroup": "idj-aks",
  "servicePrincipalProfile": {
    "clientId": "eb011c9e-3d44-4e3e-af80-59639911a101",
    "keyVaultSecretRef": null,
    "secret": null
  },
  "tags": null,
  "type": "Microsoft.ContainerService/ManagedClusters"
}
I would argue scaling down should always be immediate and a properly designed system should handle node failures. It’s worth diving deeper in this but generally a kubernetes deployment will restore pods that are terminated unexpectedly. For now, assume scale downs could impact users in production loads and plan accordingly.
Auto-Scaling
While manually scaling works fantastic when we wish to plan and know costs, sometimes we wish for a system to scale based on load. In AWS we might apply a scaling set policy to the instances behind an EKS, but Azure recently addeda very similar feature (still in preview) - autoscaling AKS clusters.
First we have to enable this feature on our account:
$ az feature register --name VMSSPreview --namespace Microsoft.ContainerService
Once the feature 'VMSSPreview' is registered, invoking 'az provider register -n Microsoft.ContainerService' is required to get the change propagated
{
  "id": "/subscriptions/d955c0ba-ffff-ffff-ffff-fffffffffb22d/providers/Microsoft.Features/providers/Microsoft.ContainerService/features/VMSSPreview",
  "name": "Microsoft.ContainerService/VMSSPreview",
  "properties": {
    "state": "Registering"
  },
  "type": "Microsoft.Features/providers/features"
}
We can then verify it is enabled:
$ az feature list -o table --query "[?contains(name, 'Microsoft.ContainerService/VMSSPreview')].{Name:name,State:properties.state}"
Name State
-------------------------------------- ----------
Microsoft.ContainerService/VMSSPreview Registered
We can check on the provider for the containerization service. This will let us know when it’s enabled:
$ az provider register --namespace Microsoft.ContainerService
Registering is still on-going. You can monitor using 'az provider show -n Microsoft.ContainerService'
note: I found that “on-going” message days later while i was actively using the cluster. checking back a week later it was null. So i would not trust that message when initially setting up your auto-scaling clusters.
There are two ways AKS can scale the cluster using this service:
- Cluster autoscaler - using this, AKS will scale up when there are no nodes left for kubernetes to schedule a pod
- Horizontal pod autoscaler - this uses the Metrics Server (recall we enabled that on the cluster) to determine scaling needs (out and in) based on resource metrics.
According to Microsoft, they are often run together:
The two autoscalers can work together, and are often both deployed in a cluster. When combined, the horizontal pod autoscaler is focused on running the number of pods required to meet application demand. The cluster autoscaler is focused on running the number of nodes required to support the scheduled pods.
Creating an Auto-Scaling cluster:
Note: only a handful of regions support auto-scaling cluster. The list as of this writing includes eastus2euap, westcentralus, centraluseuap, westus, westeurope, australiaeast, and eastus. For the demo i’ll use eastus, but i saw guides using Canadian regions, so check often.
$ az aks create \
> --resource-group idj-aks-as1 \
> --name idj-aks-as1-aks1 \
> --kubernetes-version 1.12.6 \
> --node-count 1 \
> --enable-vmss \
> --enable-cluster-autoscaler \
> --min-count 1 \
> --max-count 3 \
> --generate-ssh-keys
The behavior of this command has been altered by the following extension: aks-preview
SSH key files '/Users/isaac.johnson/.ssh/id_rsa' and '/Users/isaac.johnson/.ssh/id_rsa.pub' have been generated under ~/.ssh to allow SSH access to the VM. If using machines without permanent storage like Azure Cloud Shell without an attached file share, back up your keys to a safe location
Finished service principal creation[##################################] 100.0000%
QUICK TIP
I found my commands did not exist and assumed i was in the wrong region, however Auto-scaling is a relatively new feature that requires Azure CLI version 2.0.55 or later. You can check your version with –version:
$ az --version
azure-cli (2.0.42)
Follow this guide (https://docs.microsoft.com/en-us/cli/azure/install-azure-cli?view=azure-cli-latest) to update to the latest. And try to add the preview extension again:
$ az extension add --name aks-preview
The installed extension 'aks-preview' is in preview.
When completed you should see output like this:
When complete, the output should look like this:

$ az aks create \
> --resource-group idj-aks-as1 \
> --name idj-aks-as1-aks1 \
> --kubernetes-version 1.12.6 \
> --node-count 1 \
> --enable-vmss \
> --enable-cluster-autoscaler \
> --min-count 1 \
> --max-count 3 \
> --generate-ssh-keys
The behavior of this command has been altered by the following extension: aks-preview
SSH key files '/Users/isaac.johnson/.ssh/id_rsa' and '/Users/isaac.johnson/.ssh/id_rsa.pub' have been generated under ~/.ssh to allow SSH access to the VM. If using machines without permanent storage like Azure Cloud Shell without an attached file share, back up your keys to a safe location
{
  "aadProfile": null,
  "addonProfiles": null,
  "agentPoolProfiles": [
    {
      "count": 1,
      "enableAutoScaling": true,
      "maxCount": 3,
      "maxPods": 110,
      "minCount": 1,
      "name": "nodepool1",
      "osDiskSizeGb": 30,
      "osType": "Linux",
      "type": "VirtualMachineScaleSets",
      "vmSize": "Standard_DS2_v2",
      "vnetSubnetId": null
    }
  ],
  "apiServerAuthorizedIpRanges": null,
  "dnsPrefix": "idj-aks-as-idj-aks-as1-d955c0",
  "enableRbac": true,
  "fqdn": "idj-aks-as-idj-aks-as1-d955c0-2f330e0d.hcp.eastus.azmk8s.io",
  "id": "/subscriptions/d955c0ba-ffff-ffff-ffff-8fed74cbb22d/resourcegroups/idj-aks-as1/providers/Microsoft.ContainerService/managedClusters/idj-aks-as1-aks1",
  "kubernetesVersion": "1.12.6",
  "linuxProfile": {
    "adminUsername": "azureuser",
    "ssh": {
      "publicKeys": [
        {
          "keyData": "ssh-rsa AAAAB3NzaC1yc2EAAAADAQABAAABAQC8kZzEtkFFFFFFFFF0q6h41g5hUwPtOUPjNWPIKm4djmy4+C4+Gtsxxh5jUFooAbwl+DubFZogbU1Q5aLOGKSsD/K4XimTyOhr90DO47naCnaSS0Rg0XyZlvQsHKwcXGuGOleCMhBFFFFFFFFFFFFKQyz0WHWo7YGA6YAgtvzn1C5W0l7cT0AXgOfFEAGF31nqqTuRVBbBmosq1qhXJlVt+PO32MqmxZv44ZuCP1jWjyTz1rbQ1OLHCxP/+eDIlpOlkYop4XgwiHHMRn/rxHFTKOAxtFOccFw9KEnDM0j0M5FRBj5qFFFFFFFFIz"
        }
      ]
    }
  },
  "location": "eastus",
  "name": "idj-aks-as1-aks1",
  "networkProfile": {
    "dnsServiceIp": "10.0.0.10",
    "dockerBridgeCidr": "172.17.0.1/16",
    "networkPlugin": "kubenet",
    "networkPolicy": null,
    "podCidr": "10.244.0.0/16",
    "serviceCidr": "10.0.0.0/16"
  },
  "nodeResourceGroup": "MC_idj-aks-as1_idj-aks-as1-aks1_eastus",
  "provisioningState": "Succeeded",
  "resourceGroup": "idj-aks-as1",
  "servicePrincipalProfile": {
    "clientId": "40ee21ef-fa9d-42e9-8da9-51271b90a154",
    "secret": null
  },
  "tags": null,
  "type": "Microsoft.ContainerService/ManagedClusters"
}
Now that our cluster is created you may wish to look up the autoscaling settings under the kubernetes cluster or even something in our resource group - however neither are there:


Instead you’ll find Azure has created a new resource group to contain the NSG, Route Table, VNet and Virtual machine scale set.

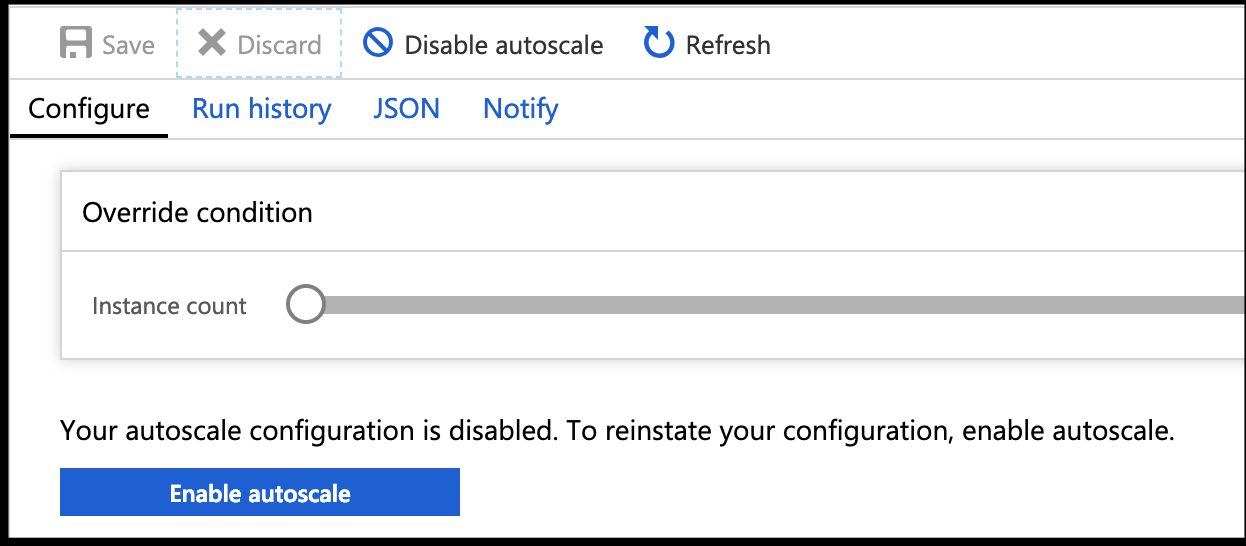
Checking the Scaling details, we see that by default the scaling policy isnt enabled:
However, it’s easy to configure. Let’s start by adding a condition to scale out on CPU.

Then let’s set up helm and try putting some load on our cluster.
First, even though we didn’t explicitly enable RBAC, i found that AKS did on our behalf anyways as is the behaviour on the latest Kubernetes versions and thusly you’ll need to install helm with RBAC enabled.
Following the helm guide:
$ vi helm-rbac.yaml
$ cat helm-rbac.yaml
apiVersion: v1
kind: ServiceAccount
metadata:
  name: tiller
  namespace: kube-system
---
apiVersion: rbac.authorization.k8s.io/v1
kind: ClusterRoleBinding
metadata:
  name: tiller
roleRef:
  apiGroup: rbac.authorization.k8s.io
  kind: ClusterRole
  name: cluster-admin
subjects:
  - kind: ServiceAccount
    name: tiller
    namespace: kube-system
$ kubectl apply -f helm-rbac.yaml
serviceaccount/tiller created
clusterrolebinding.rbac.authorization.k8s.io/tiller created
$ helm init --service-account tiller --upgrade
$HELM_HOME has been configured at /Users/isaac.johnson/.helm.

Tiller (the Helm server-side component) has been upgraded to the current version.
Happy Helming!
Then to test, let’s set up SonarQube again like we did in our first Part.
$ helm install stable/sonarqube
NAME: hissing-gorilla
LAST DEPLOYED: Sat Mar 16 22:29:20 2019
NAMESPACE: default
STATUS: DEPLOYED

RESOURCES:
==> v1/ConfigMap
NAME DATA AGE
hissing-gorilla-sonarqube-config 0 1s
hissing-gorilla-sonarqube-copy-plugins 1 1s
hissing-gorilla-sonarqube-install-plugins 1 1s
hissing-gorilla-sonarqube-tests 1 1s

==> v1/PersistentVolumeClaim
NAME STATUS VOLUME CAPACITY ACCESS MODES STORAGECLASS AGE
hissing-gorilla-postgresql Pending default 1s

==> v1/Pod(related)
NAME READY STATUS RESTARTS AGE
hissing-gorilla-postgresql-799d79995c-67pfp 0/1 Pending 0 0s
hissing-gorilla-sonarqube-5c84c7447f-p7pvf 0/1 ContainerCreating 0 0s

==> v1/Secret
NAME TYPE DATA AGE
hissing-gorilla-postgresql Opaque 1 1s

==> v1/Service
NAME TYPE CLUSTER-IP EXTERNAL-IP PORT(S) AGE
hissing-gorilla-postgresql ClusterIP 10.0.214.153 <none> 5432/TCP 1s
hissing-gorilla-sonarqube LoadBalancer 10.0.23.136 <pending> 9000:31894/TCP 0s

==> v1beta1/Deployment
NAME READY UP-TO-DATE AVAILABLE AGE
hissing-gorilla-postgresql 0/1 1 0 0s
hissing-gorilla-sonarqube 0/1 1 0 0s

NOTES:
1. Get the application URL by running these commands:
     NOTE: It may take a few minutes for the LoadBalancer IP to be available.
           You can watch the status of by running 'kubectl get svc -w hissing-gorilla-sonarqube'
  export SERVICE_IP=$(kubectl get svc --namespace default hissing-gorilla-sonarqube -o jsonpath='{.status.loadBalancer.ingress[0].ip}')
  echo http://$SERVICE_IP:9000
And we can see it running right away:
$ kubectl get pods
NAME READY STATUS RESTARTS AGE
hissing-gorilla-postgresql-799d79995c-67pfp 1/1 Running 0 3m41s
hissing-gorilla-sonarqube-5c84c7447f-p7pvf 0/1 Running 3 3m41s
But without a policy set, we won’t see any scaling occur:

I want to check my cluster status, but RBAC makes that a bit more complicated. We will need to get a dashboard user created first and use that to log in:
$ vi dashboard-rbac.yaml
$ cat dashboard-rbac.yaml
apiVersion: v1
kind: ServiceAccount
metadata:
  name: aks-dashboard-admin
  namespace: kube-system
---
apiVersion: rbac.authorization.k8s.io/v1
kind: ClusterRoleBinding
metadata:
  name: aks-dashboard-admin
roleRef:
  apiGroup: rbac.authorization.k8s.io
  kind: ClusterRole
  name: cluster-admin
subjects:
- kind: ServiceAccount
  name: aks-dashboard-admin
  namespace: kube-system
$ kubectl apply -f dashboard-rbac.yaml
serviceaccount/aks-dashboard-admin created
clusterrolebinding.rbac.authorization.k8s.io/aks-dashboard-admin created
$ kubectl get secret --namespace dashboard-admin -o jsonpath="{.secrets[0].name}") -o jsonpath="{.data.token}" | base64 --decode
eyJhbGciOiJSUxxxxxxxxxxx3JM
You can also do this manually without the yaml:
$ kubectl create serviceaccount kubernetes-dashboard -n kube-system
Error from server (AlreadyExists): serviceaccounts "kubernetes-dashboard" already exists
$ kubectl create clusterrolebinding kubernetes-dashboard -n kube-system --clusterrole=cluster-admin --serviceaccount=kube-system:kubernetes-dashboard
clusterrolebinding.rbac.authorization.k8s.io/kubernetes-dashboard created
$ kubectl get secret $(kubectl get serviceaccount kubernetes-dashboard -n kube-system -o jsonpath="{.secrets[0].name}") -n kube-system -o jsonpath="{.data.token}" | base64 --decode
eyJhb…..
Then we can create a proxy tunnel and browse:
$ az aks browse --resource-group idj-aks-as1 --name idj-aks-as1-aks1
You will see a spew of errors until you login:
http://127.0.0.1:8001/#!/login
Note: While that token above should have worked, ultimately i gave up trying and used the kube-config (cp ~/.kube/config ~/my-kube-config so you can see it). That worked fine.
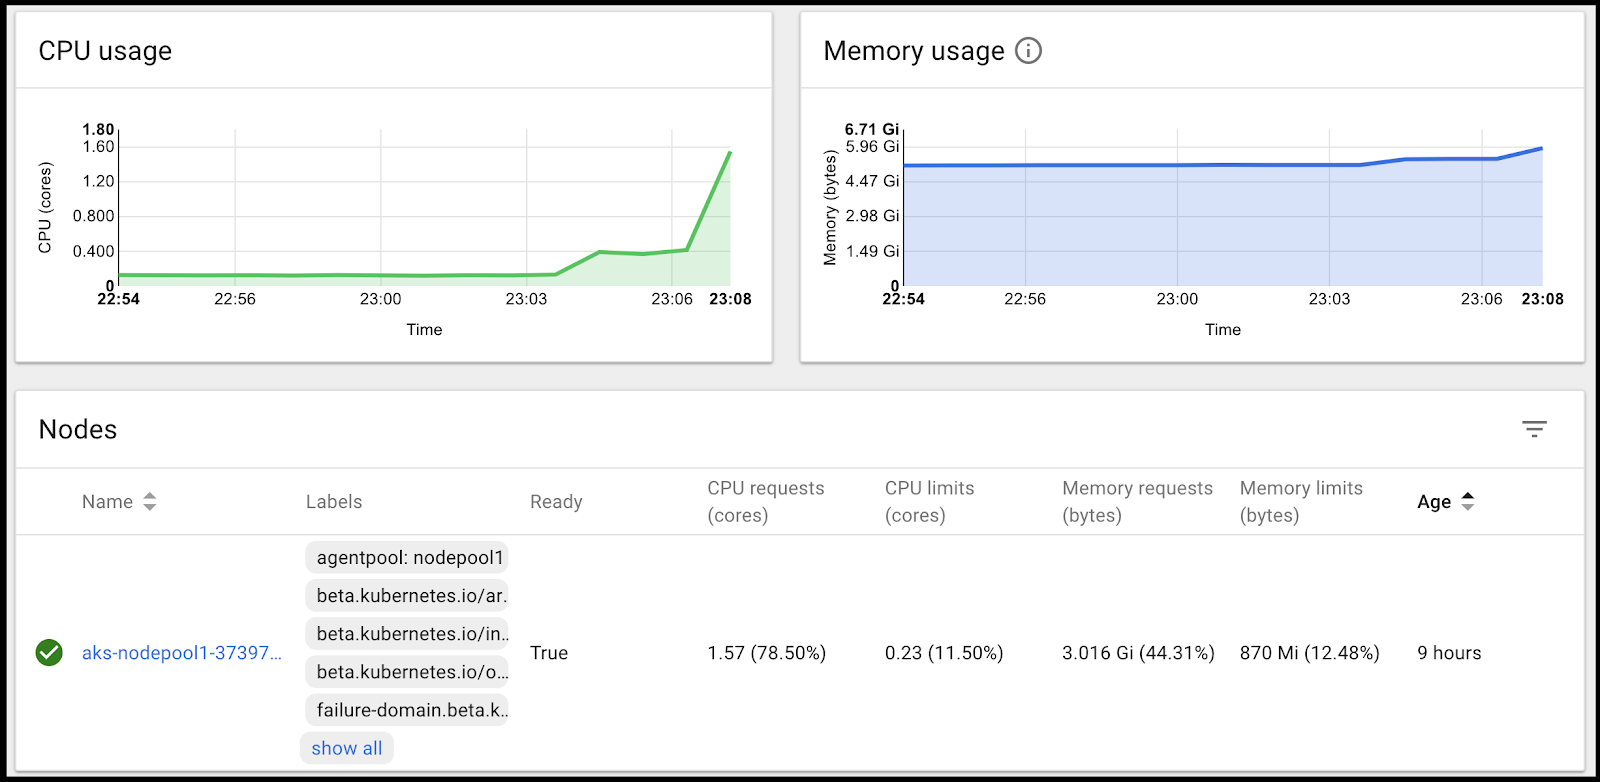
In the dashboard we can now see our release (which matched our helm install) and that it really isn’t causing much load:
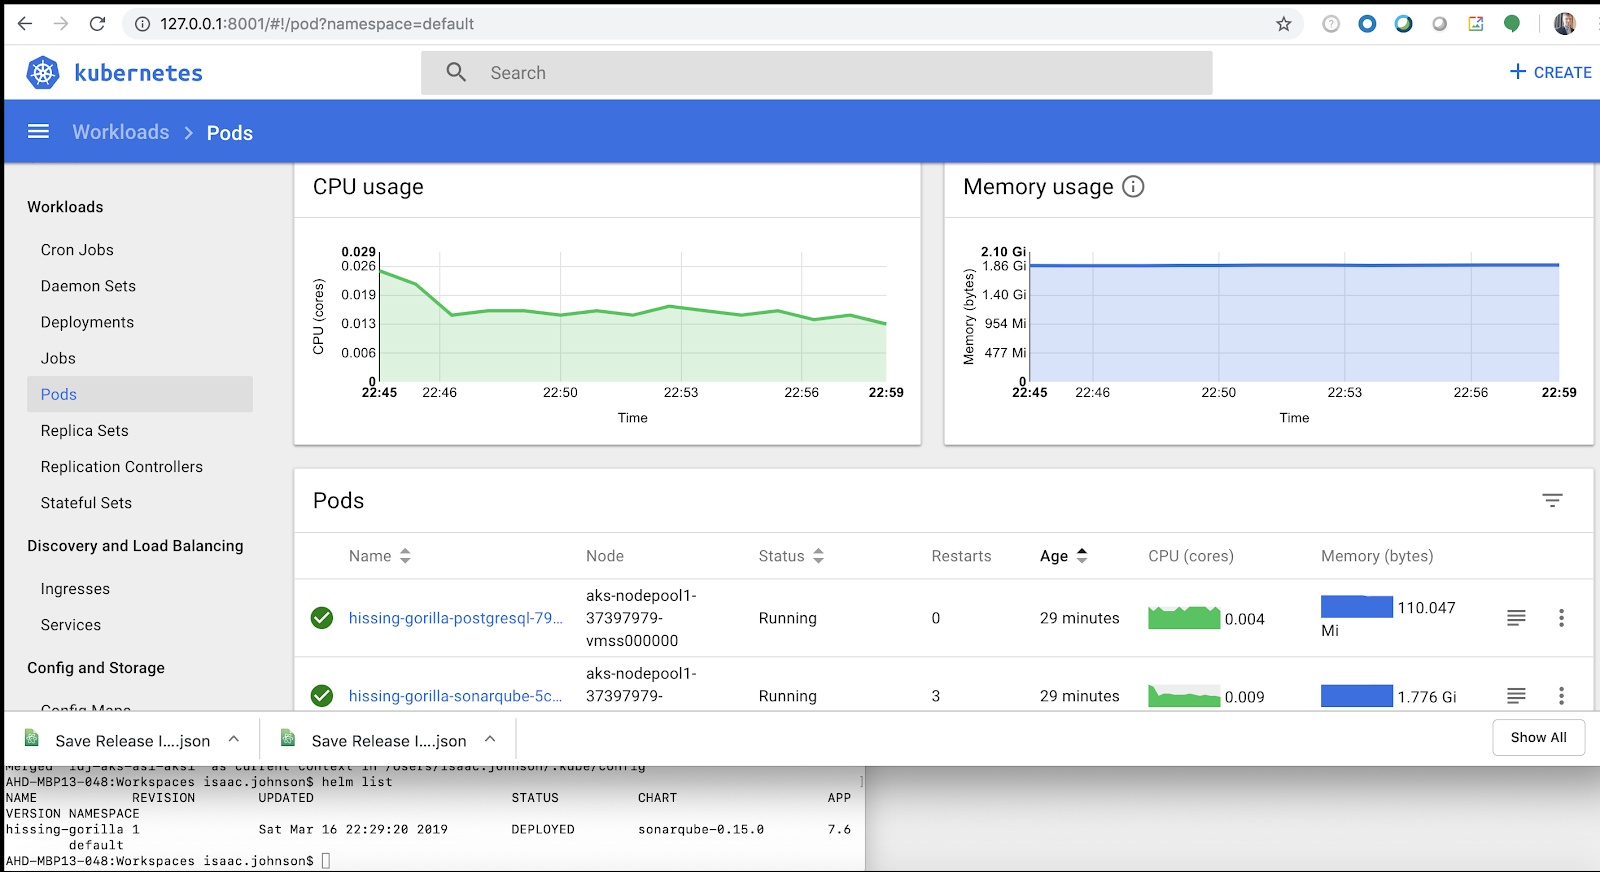
Our first test is to see if we can’t load this one node cluster up and see some performance degradation…
Hammering a Cluster
We can actually scale from inside the dashboard:
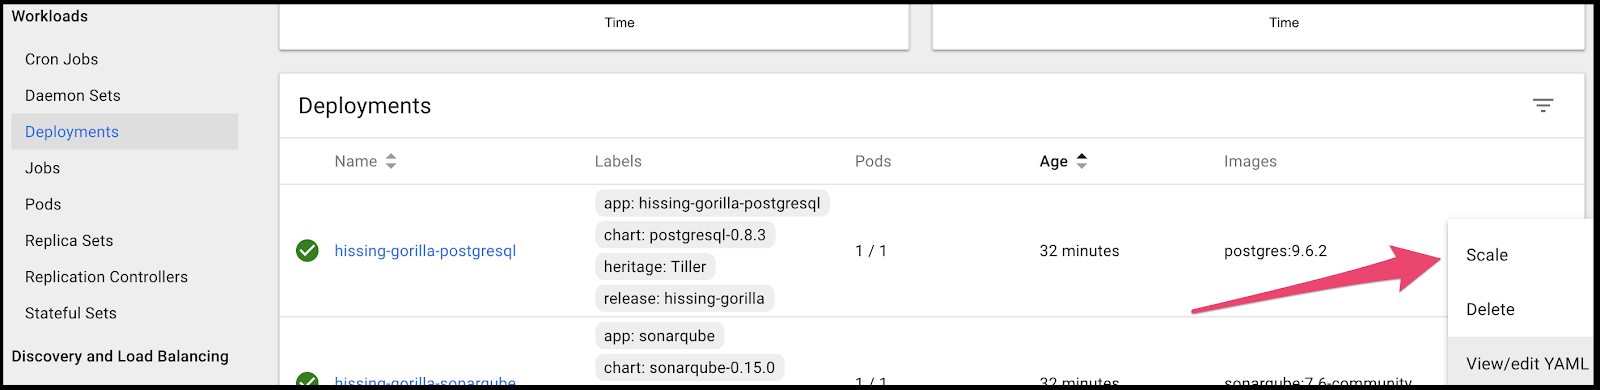
Let’s scale the Postgres to 10 active pods and see what the cluster does:

Scaling to 10 pods of each, we hit our memory threshold first:

However, because we don’t yet have the policy enabled, we are still just using one node:
Scaling Policy
Let’s set up that scaling policy and see if we can’t help this cluster out. We will create a scaling set and set up a rule to scale out when CPU (on average) exceeds 25%:

In a few minutes not only will we scale enough nodes to cover the Deployments, we will see the new size reflected in the dashboard:

This worked great, but we ideally would like to scale back in when the demand becomes low otherwise we will only ever grow the cluster.
Let’s add a scale in rule on our scale set:

Now, just to make sure we trigger the rule, let’s also decrease our deployment pod counts down to 1:

We can immediately see them starting to terminate in the pods list:
$ kubectl get pods
NAME READY STATUS RESTARTS AGE
hissing-gorilla-postgresql-799d79995c-67pfp 0/1 Terminating 1 67m
hissing-gorilla-postgresql-799d79995c-72r7b 0/1 Terminating 1 33m
hissing-gorilla-postgresql-799d79995c-7ksp2 0/1 Terminating 1 33m
hissing-gorilla-postgresql-799d79995c-7xnsx 0/1 Terminating 1 33m
hissing-gorilla-postgresql-799d79995c-8dnbm 0/1 Terminating 1 33m
hissing-gorilla-postgresql-799d79995c-bk77p 0/1 Terminating 1 33m
hissing-gorilla-postgresql-799d79995c-dhkw5 0/1 Terminating 1 33m
hissing-gorilla-postgresql-799d79995c-ghps2 1/1 Running 1 33m
hissing-gorilla-postgresql-799d79995c-vntfp 0/1 Terminating 1 33m
hissing-gorilla-postgresql-799d79995c-xvkhs 0/1 Terminating 1 33m
hissing-gorilla-sonarqube-5c84c7447f-22q69 0/1 Evicted 0 30m
hissing-gorilla-sonarqube-5c84c7447f-2bn9j 0/1 Evicted 0 29m
hissing-gorilla-sonarqube-5c84c7447f-2mlmf 0/1 Evicted 0 29m
hissing-gorilla-sonarqube-5c84c7447f-2ttwr 0/1 Evicted 0 14m
hissing-gorilla-sonarqube-5c84c7447f-2vmtn 0/1 Evicted 0 12m
hissing-gorilla-sonarqube-5c84c7447f-2zjhc 0/1 Evicted 0 12m
hissing-gorilla-sonarqube-5c84c7447f-4p5fr 0/1 Evicted 0 29m
hissing-gorilla-sonarqube-5c84c7447f-4s8lw 0/1 Terminating 3 19m
hissing-gorilla-sonarqube-5c84c7447f-6flgx 0/1 Evicted 0 29m
hissing-gorilla-sonarqube-5c84c7447f-6kd4b 0/1 Evicted 0 12m
hissing-gorilla-sonarqube-5c84c7447f-6kgl7 0/1 Evicted 0 12m
hissing-gorilla-sonarqube-5c84c7447f-6mrmb 0/1 Evicted 0 12m
hissing-gorilla-sonarqube-5c84c7447f-6ptf2 0/1 Evicted 0 12m
hissing-gorilla-sonarqube-5c84c7447f-75djm 1/1 Terminating 1 12m
hissing-gorilla-sonarqube-5c84c7447f-7bxrj 0/1 Evicted 0 29m
hissing-gorilla-sonarqube-5c84c7447f-7rcw5 0/1 Terminating 2 30m
hissing-gorilla-sonarqube-5c84c7447f-9t4bn 1/1 Running 0 14m
hissing-gorilla-sonarqube-5c84c7447f-9xkjz 1/1 Terminating 0 10m
hissing-gorilla-sonarqube-5c84c7447f-bbvcz 0/1 Evicted 0 12m
hissing-gorilla-sonarqube-5c84c7447f-bcqb5 0/1 Evicted 0 12m
hissing-gorilla-sonarqube-5c84c7447f-bpgxv 0/1 Evicted 0 29m
hissing-gorilla-sonarqube-5c84c7447f-dgg86 0/1 Evicted 0 29m
hissing-gorilla-sonarqube-5c84c7447f-dl2dc 0/1 Evicted 0 12m
hissing-gorilla-sonarqube-5c84c7447f-dz5wq 0/1 Evicted 0 29m
hissing-gorilla-sonarqube-5c84c7447f-dzc9r 0/1 Evicted 0 12m
hissing-gorilla-sonarqube-5c84c7447f-dzgmm 0/1 Evicted 0 12m
hissing-gorilla-sonarqube-5c84c7447f-f5pl8 0/1 Evicted 0 12m
hissing-gorilla-sonarqube-5c84c7447f-f8z4x 0/1 Evicted 0 29m
hissing-gorilla-sonarqube-5c84c7447f-fhg6r 0/1 Evicted 0 30m
hissing-gorilla-sonarqube-5c84c7447f-gznls 0/1 Evicted 0 12m
hissing-gorilla-sonarqube-5c84c7447f-hjj67 0/1 Evicted 0 29m
hissing-gorilla-sonarqube-5c84c7447f-jjrrv 0/1 Evicted 0 30m
hissing-gorilla-sonarqube-5c84c7447f-jp6rh 0/1 Evicted 0 29m
hissing-gorilla-sonarqube-5c84c7447f-jpdxp 0/1 Evicted 0 12m
hissing-gorilla-sonarqube-5c84c7447f-k2wt4 0/1 Evicted 0 29m
hissing-gorilla-sonarqube-5c84c7447f-k7vtq 0/1 Evicted 0 29m
hissing-gorilla-sonarqube-5c84c7447f-kpt8q 1/1 Terminating 0 12m
hissing-gorilla-sonarqube-5c84c7447f-l5h5b 0/1 Evicted 0 12m
hissing-gorilla-sonarqube-5c84c7447f-lb6t8 0/1 Evicted 0 12m
hissing-gorilla-sonarqube-5c84c7447f-lfsgl 0/1 Evicted 0 29m
hissing-gorilla-sonarqube-5c84c7447f-ms2zd 0/1 Evicted 0 30m
hissing-gorilla-sonarqube-5c84c7447f-n25rs 0/1 Evicted 0 29m
hissing-gorilla-sonarqube-5c84c7447f-n54dq 0/1 Evicted 0 12m
Within a few minutes we will start to see the VMSS start to delete unnecessary nodes:
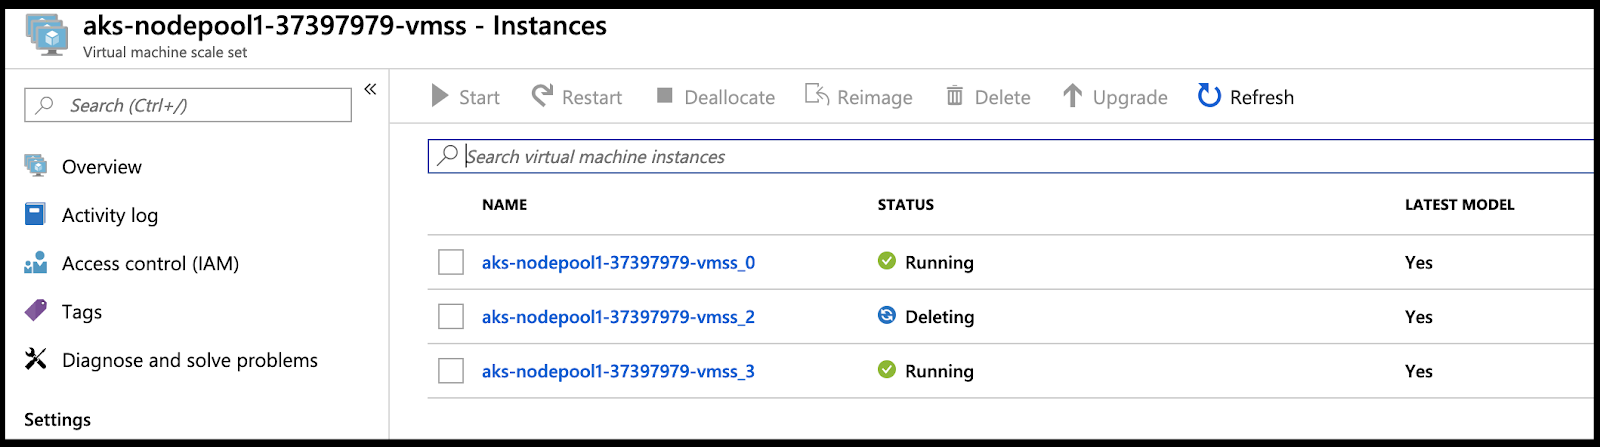
In a few moments, we’ll see that reflected in the dashboard as well:


Vertical Scaling:
First, lets create a fresh scaling cluster:
$ az group create --location eastus --name idj-aks-as2
{
  "id": "/subscriptions/d955c0ba-ffff-ffff-ffff-ffffffffb22d/resourceGroups/idj-aks-as2",
  "location": "eastus",
  "managedBy": null,
  "name": "idj-aks-as2",
  "properties": {
    "provisioningState": "Succeeded"
  },
  "tags": null,
  "type": null
}

$ az aks create --resource-group idj-aks-as2 --name idj-aks-as2-aks1 --kubernetes-version 1.12.6 --node-count 1 --enable-vmss --enable-cluster-autoscaler --min-count 1 --max-count 3 --generate-ssh-keys
The behavior of this command has been altered by the following extension: aks-preview
 - Running ..
{
  "aadProfile": null,
  "addonProfiles": null,
  "agentPoolProfiles": [
    {
      "count": 1,
      "enableAutoScaling": true,
      "maxCount": 3,
      "maxPods": 110,
      "minCount": 1,
      "name": "nodepool1",
      "osDiskSizeGb": 30,
      "osType": "Linux",
      "type": "VirtualMachineScaleSets",
      "vmSize": "Standard_DS2_v2",
      "vnetSubnetId": null
    }
  ],
  "apiServerAuthorizedIpRanges": null,
  "dnsPrefix": "idj-aks-as-idj-aks-as2-d955c0",
  "enableRbac": true,
  "fqdn": "idj-aks-as-idj-aks-as2-d955c0-8cde2d57.hcp.eastus.azmk8s.io",
  "id": "/subscriptions/d955c0ba-ffff-ffff-ffff-fffffffb22d/resourcegroups/idj-aks-as2/providers/Microsoft.ContainerService/managedClusters/idj-aks-as2-aks1",
  "kubernetesVersion": "1.12.6",
  "linuxProfile": {
    "adminUsername": "azureuser",
    "ssh": {
      "publicKeys": [
        {
          "keyData": "ssh-rsa AAAAB3NzaC1yc2EAAAAFFFFFFFFFFFFFFIE1jcQ0q6h41g5hUwPtOUPjNWPIKm4djmy4+C4+Gtsxxh5jUFFFFFFFFFFFFFFK4XimTyOhr90DO47naCnaSS0Rg0XyZlvQsHKwcXGuGOleCMhB2gQ70QAK4X/N1dvGfqCDdKBbTORKQyz0WHWo7YGA6YAgtvzn1C5W0l7cT0AXgOfFEAGF31nqqTuRVBbBmosq1qhXJlVt+PO32MqmxZv44ZuCP1jWjyTz1rbQ1OLHCxP/+eDIlpOlkYop4XgwiHHMRn/rxHFTKOAxtFFFFFFFF/6jhnu7LIz"
        }
      ]
    }
  },
  "location": "eastus",
  "name": "idj-aks-as2-aks1",
  "networkProfile": {
    "dnsServiceIp": "10.0.0.10",
    "dockerBridgeCidr": "172.17.0.1/16",
    "networkPlugin": "kubenet",
    "networkPolicy": null,
    "podCidr": "10.244.0.0/16",
    "serviceCidr": "10.0.0.0/16"
  },
  "nodeResourceGroup": "MC_idj-aks-as2_idj-aks-as2-aks1_eastus",
  "provisioningState": "Succeeded",
  "resourceGroup": "idj-aks-as2",
  "servicePrincipalProfile": {
    "clientId": "40ee21ef-fa9d-42e9-8da9-51271b90a154",
    "secret": null
  },
  "tags": null,
  "type": "Microsoft.ContainerService/ManagedClusters"
}
You’ll note the vmSize in the output above:
"vmSize": "Standard_DS2_v2",
We can look up the instance under the VMSS and see the same reflected in the one instance count:

But perhaps we want to scale up or down (make it bigger or smaller).

Choosing resize and saving won’t affect our running instance which is still “Standard_DS2_v2”
However, if we go to scaling and scale out:

We will see it scale out and indicate our former is now out of date to the scale set (because of size):

QUICK TIP:
We may get an error telling us that isn’t a valid size (i found i could just move to the larger instance in my case):
Failed to update autoscale configuration for 'aks-nodepool1-36739375-vmss'.{
  "error": {
    "details": [],
    "code": "VMSizeIsNotPermittedToEnableAcceleratedNetworkingForVmss",
    "message": "Virtual Machine size Standard_B2s is not in the allowed list of VM sizes for accelerated networking to be enabled on the VM at index 0 for VM Scale Set /subscriptions/d955c0ba-13dc-44cf-a29a-8fed74cbb22d/resourceGroups/MC_idj-aks-as2_idj-aks-as2-aks1_eastus/providers/Microsoft.Compute/virtualMachineScaleSets/aks-nodepool1-36739375-vmss. Allowed sizes: Standard_D3_v2, Standard_D12_v2, Standard_D3_v2_Promo, Standard_D12_v2_Promo, Standard_DS3_v2, Standard_DS12_v2, Standard_DS13-4_v2, Standard_DS14-4_v2, Standard_DS3_v2_Promo, Standard_DS12_v2_Promo, Standard_DS13-4_v2_Promo, Standard_DS14-4_v2_Promo, Standard_F4, Standard_F4s, Standard_D8_v3, Standard_D8s_v3, Standard_D32-8s_v3, Standard_E8_v3, Standard_E8s_v3, Standard_D3_v2_ABC, Standard_D12_v2_ABC, Standard_F4_ABC, Standard_F8s_v2, Standard_D4_v2, Standard_D13_v2, Standard_D4_v2_Promo, Standard_D13_v2_Promo, Standard_DS4_v2, Standard_DS13_v2, Standard_DS14-8_v2, Standard_DS4_v2_Promo, Standard_DS13_v2_Promo, Standard_DS14-8_v2_Promo, Standard_F8, Standard_F8s, Standard_M64-16ms, Standard_D16_v3, Standard_D16s_v3, Standard_D32-16s_v3, Standard_D64-16s_v3, Standard_E16_v3, Standard_E16s_v3, Standard_E32-16s_v3, Standard_D4_v2_ABC, Standard_D13_v2_ABC, Standard_F8_ABC, Standard_F16s_v2, Standard_D5_v2, Standard_D14_v2, Standard_D5_v2_Promo, Standard_D14_v2_Promo, Standard_DS5_v2, Standard_DS14_v2, Standard_DS5_v2_Promo, Standard_DS14_v2_Promo, Standard_F16, Standard_F16s, Standard_M64-32ms, Standard_M128-32ms, Standard_D32_v3, Standard_D32s_v3, Standard_D64-32s_v3, Standard_E32_v3, Standard_E32s_v3, Standard_E32-8s_v3, Standard_E32-16_v3, Standard_D5_v2_ABC, Standard_D14_v2_ABC, Standard_F16_ABC, Standard_F32s_v2, Standard_D15_v2, Standard_D15_v2_Promo, Standard_D15_v2_Nested, Standard_DS15_v2, Standard_DS15_v2_Promo, Standard_DS15_v2_Nested, Standard_D40_v3, Standard_D40s_v3, Standard_D15_v2_ABC, Standard_M64ms, Standard_M64s, Standard_M128-64ms, Standard_D64_v3, Standard_D64s_v3, Standard_E64_v3, Standard_E64s_v3, Standard_E64-16s_v3, Standard_E64-32s_v3, Standard_F64s_v2, Standard_F72s_v2, Standard_M128s, Standard_M128ms, Standard_L8s_v2, Standard_L16s_v2, Standard_L32s_v2, Standard_L64s_v2, SQLGL, SQLGLCore, Standard_D4_v3, Standard_D4s_v3, Standard_D2_v2, Standard_DS2_v2, Standard_E4_v3, Standard_E4s_v3, Standard_F2, Standard_F2s, Standard_F4s_v2, Standard_D11_v2, Standard_DS11_v2, AZAP_Performance_ComputeV17C, AZAP_Performance_ComputeV17C_DDA, Standard_PB6s, Standard_PB12s, Standard_PB24s, Standard_L80s_v2, Standard_M8ms, Standard_M8-4ms, Standard_M8-2ms, Standard_M16ms, Standard_M16-8ms, Standard_M16-4ms, Standard_M32ms, Standard_M32-8ms, Standard_M32-16ms, Standard_M32ls, Standard_M32ts, Standard_M64ls, Standard_E64i_v3, Standard_E64is_v3, Standard_E4-2s_v3, Standard_E8-4s_v3, Standard_E8-2s_v3, Standard_E16-4s_v3, Standard_E16-8s_v3, Standard_E20s_v3, Standard_E20_v3, Standard_D11_v2_Promo, Standard_D2_v2_Promo, Standard_DS11_v2_Promo, Standard_DS2_v2_Promo, Standard_M208ms_v2, Standard_MDB16s, Standard_MDB32s, Experimental_E64-40s_v3, Standard_DS11-1_v2, Standard_DS12-1_v2, Standard_DS12-2_v2, Standard_DS13-2_v2, MSODSG5, Special_CCX_DS13_v2, Special_CCX_DS14_v2."
  }
}
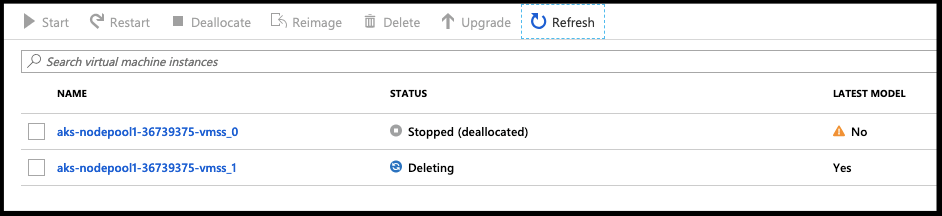
Once the new instance has been created, we deallocate the former instance:


Then delete it before changing the instance count.
_ Note - if we reduce our instances to 1 before deleting it, the VMSS will actually delete the currently running larger instance and break our cluster:_
We can check the VMSS details and see we are now using the larger instance class:

Cleaning up:
While you could go nuclear and just start finding and destroying resources, we can do it a bit more elegantly and efficiently.
First, delete the autoscaler from the cluster:
$ az aks update --resource-group idj-aks-as1 --name idj-aks-as1-aks1 --disable-cluster-autoscaler
 - Running ..
$ az aks update --resource-group idj-aks-as1 --name idj-aks-as1-aks1 --disable-cluster-autoscaler
{
  "aadProfile": null,
  "addonProfiles": null,
  "agentPoolProfiles": [
    {
      "count": 1,
      "enableAutoScaling": false,
      "maxCount": null,
      "maxPods": 110,
      "minCount": null,
      "name": "nodepool1",
      "osDiskSizeGb": 30,
      "osType": "Linux",
      "type": "VirtualMachineScaleSets",
      "vmSize": "Standard_DS2_v2",
      "vnetSubnetId": null
    }
  ],
  "apiServerAuthorizedIpRanges": null,
  "dnsPrefix": "idj-aks-as-idj-aks-as1-d955c0",
  "enableRbac": true,
  "fqdn": "idj-aks-as-idj-aks-as1-d955c0-2f330e0d.hcp.eastus.azmk8s.io",
  "id": "/subscriptions/d955c0ba-13dc-44cf-a29a-8fed74cbb22d/resourcegroups/idj-aks-as1/providers/Microsoft.ContainerService/managedClusters/idj-aks-as1-aks1",
  "kubernetesVersion": "1.12.6",
  "linuxProfile": {
    "adminUsername": "azureuser",
    "ssh": {
      "publicKeys": [
        {
          "keyData": "ssh-rsa AAAAB3NzaC1yc2EAAAFFFFFFFFJIE1jcQ0q6h41g5hUwPtOUPjNWPIKm4djmy4+C4+Gtsxxh5jUFooAbwl+DubFZogbU1Q5aLOGFFFFFFFFFFFS0Rg0XyZlvQsHKwcXGuGOleCMhB2gQ70QAK4X/N1dvGfqCDdKBbTORKQyz0WHWo7YGA6YAgtvzn1C5W0l7cT0AXgOfFEAGF31nqqTuRVBbBmosq1qhXJlVt+PO32MqmxZv44FFFFFFFFFFFFP/+eDIlpOlkYop4XgwiHHMRn/rxHFTKOAxtFOccFw9KEnDM0j0M5FRBj5qU1BCa/6jhnu7LIz"
        }
      ]
    }
  },
  "location": "eastus",
  "name": "idj-aks-as1-aks1",
  "networkProfile": {
    "dnsServiceIp": "10.0.0.10",
    "dockerBridgeCidr": "172.17.0.1/16",
    "networkPlugin": "kubenet",
    "networkPolicy": null,
    "podCidr": "10.244.0.0/16",
    "serviceCidr": "10.0.0.0/16"
  },
  "nodeResourceGroup": "MC_idj-aks-as1_idj-aks-as1-aks1_eastus",
  "provisioningState": "Succeeded",
  "resourceGroup": "idj-aks-as1",
  "servicePrincipalProfile": {
    "clientId": "40ee21ef-ffff-ffff-ffff-fffffffa154",
    "secret": null
  },
  "tags": null,
  "type": "Microsoft.ContainerService/ManagedClusters"
}
From there we can see the Resource group (MC_idj-aks-as1_idj-aks-as1-aks1_eastus) we need to remove now that it’s been disconnected from the cluster.
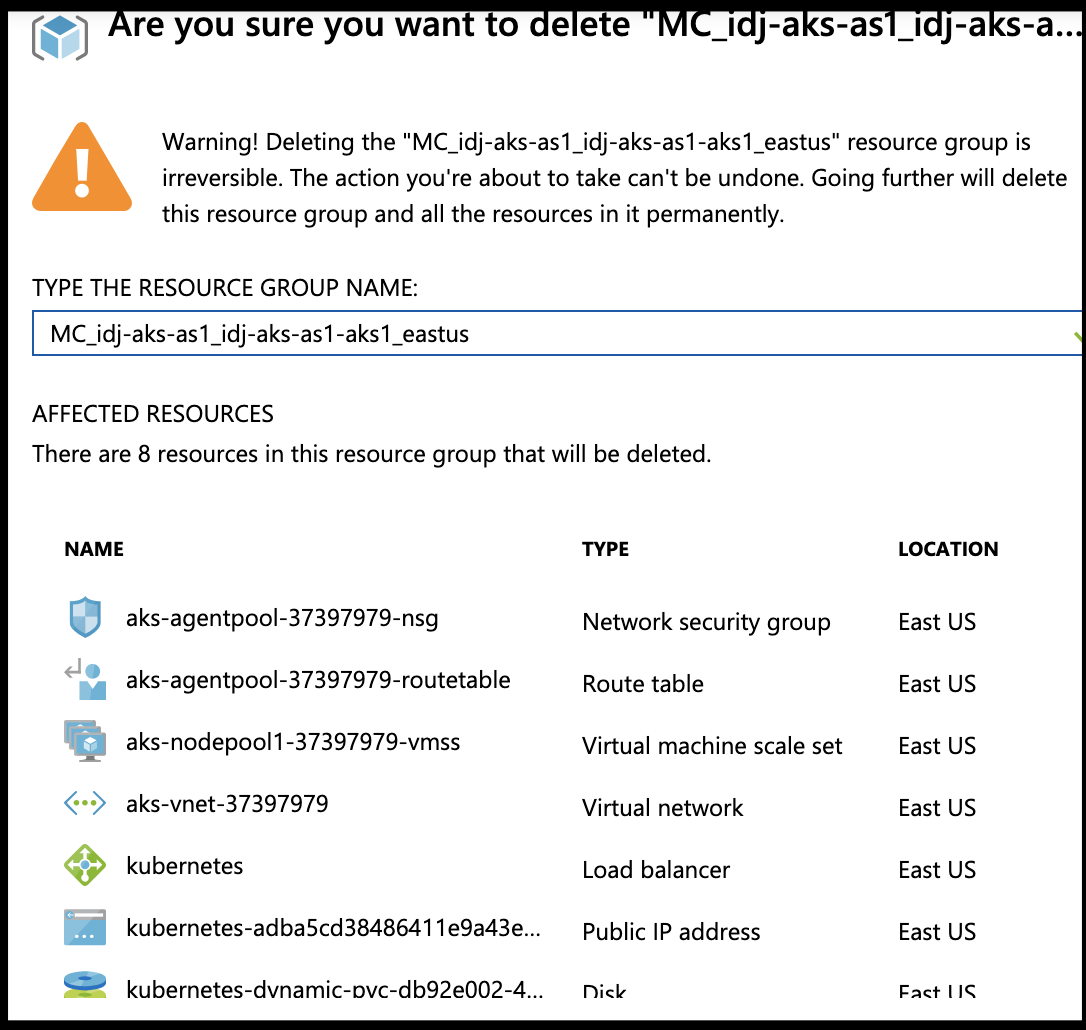
You can then go and cleanup your remaining resources.
The importance of cleanup.
Most services don’t cost that much, but a k8s cluster can really add up fast. For instance, For 6 days since i wrote the last blog entry, i left up a cluster with autoscaling to validate costs wouldn’t be that high. It just had one node after all.
But I had neglected to check the VMSS behind the autoscaler which was set, by default, to have one node up. These are not the tiny little t2.micro/A0 instances.. The are fat little D2 v2 and what’s more D S 2 v2. Decent CPU and SSD storage. In 6 days, a cluster effectively sitting idle totally nearly US$20.

It’s for that reason that cleaning up should be something you do (unless you want to explain to the boss the large Microsoft cloud bill on the next CC statement).
Summary:
In this guide we dove head-first into Auto-Scaling AKS clusters. We explored how to create them, log into the dashboard, and adjust the VM Scaling Set policies to meet our needs. We tested scaling out and in using a SonarQube helm chart, a practical application of vertical scaling and lastly we cleaned up our resources.